| |
Bertram31.com General Bulletin Board
Re: B20 steering *LINK* *PIC*
Posted By: Capt Patrick McCrary In Response To: Re: B20 steering (Kurt)
Date: Saturday, 19 February 2005, at 8:45 p.m.
Kurt,
Don't know how handy you are with your hands of if you've ever done any fiber glassing. Building a new small hatch cover is a good starter project for even the novice...
I won't get into the technique of working fiberglass, there are a number of books available for that. Here's the set up for "one offing" a hatch cover in fiberglass from an existing hatch opening that is basically square or rectangular:
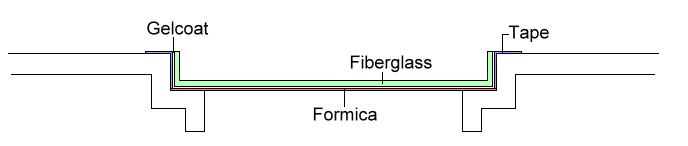
1. Mask out the entire hatch opening, top bottom, & inside. Keep your tape smooth. Use with 3M Blue Easy Release tape.
1a. Cut a piece of heavy Formica style laminate to exactly fit the opening.
2. Place the laminate into the opening and seal completely around the perimeter with regular modeling clay, removing any excess, but making sure that there are no gaps for resin to get into.
3. Tape the rest of the opening.
4. check to make sure that there is no under cuts or positive draft on the vertical walls of the opening. If there is, use strips of Formica rather than tape. Use the modeling clay to shim out the Formica so that the base perimeter of the opening is slightly smaller than the top of the opening. Failure to do this could cause your fiberglass part to be locked into the opening. Seal any gaps or spaces with the clay. (Read my discussion on making a temporary mold, linked below. YOu project would just be miniature of that project.)
5. You should now have a very clean temporary mold in which to build the part. Any features, excess clay, or other irregularities will be transmitted to your part, so strive for perfection...
6. Tape around the opening so you don't get the fiberglass materials on your deck. A 2" margin should do you well.
7. Carefully wax the entire interior of the mold and the tape on the deck with Colinite's Insulator wax. Wipe away any excess, allow to dry for 30 minutes, and apply a second coat of wax.
8. After the second coat of wax has dried for 30 minutes, mix enough gelcoat to cover the entire inside of the mold. Apply with a brush. Don't try to get a heavy buildup in one application... Allow the first application to cure to a tacky stage and apply a second coat. Continue this through 4 light applications. Allow a little extra build up in the corners so that you'll have some extra material to round over when you refine the cover.
9. Allow the gelcoat to cure until it's hard.
10. Mix a small amount of polyester resin with extra catalyst for a faster cure. Paint it onto the gelcoat in a very thin coating. Allow it to tack up.
11. Add a layer of 1 1/2 chopped strand fiberglass mat cut to fit the bottom of the mold. Add strips to the vertical walls. Don't try to wrap around corners, it won't work... 4 strips & 1 bottom.
12. Wet this out with catalyzed resin & try to eliminate all air bubbles. Use a 1 1/2" brush. After all of the fiberglass is wetted out and down without trapped bubbles, wipe your brush off and go back and pick all excess resin using a dabbing movement. Allow this "skin" layup to cure until hard.
13. Sand lightly the skin layer with 80 grit paper to remove any strands of fiberglass sticking up.
14. Cut and fit 3 more sets of wall strips & 3 more bottom pieces. Just as you did the skin layer, work in the 1st layer. Fit the 2nd dry lay up in place, keeping in mind that your cavity is decreasing in dimension, so you will need to trim slightly each successive batch of glass to make it fit properly. Wet out and work in the second layer, then the third. This can all be accomplished in a single operation, but layer by layer. Allow this layup to cure over night.
You now have a gelcoated shell in which to bond in your core & glass over the under side. But DO NOT lay in the core at this point.
First remove the part from the hatch opening. The whole mold and part should come out without too much effort provided you were careful and sealed out any possibility of resin getting to the actual hatch opening & you didn't leave any under cuts that would lock the part into place.
Strip away the Formica and flip the part over and check for fit. Remember that the part will be going in upside down from how it was built, so the fit may not be quite the same & require some sanding adjustment. Sand or grind the edges for a finished height in the hatch opening. Be sure to make allowance for any gasketing thickness that you will be adding and the fact that yu will be laying on another 1/16" of fiberglass to cover the underside. In, other words, the hieght of the hatch cover shell should be between 1/16" - 3/16" below the deck level at this stage.
Cut a slightly loose fitting core from plywood or structural PVC foam. The thickness of the core should be flush with the top edge of the shell.
Bed the core into the shell using thickened resin. You can use virtually any dry powdered material for the thickening material. My preference would be Cabosil and microballons. Saw dust will work, in a real pinch dry dirt works too. Mix the "mud" to about the consistency of mayonnaise, liberally coat the inside surface of the shell and the surface of the core.
Insert the core and press it down to the bottom of the shell slowly. As you press it in, catch all squeeze out and return it to the mixing cup.
Clean all excess mud up and let the resin cure until hard. The final step is to add a couple of layers of the mat to the back side and, when cured, do any final refinement to your new hatch cover.
It sounds like a lot to absorb and tackle, but on a scale of 1 - 10 in difficulty, I'd give this project about a 4...
Best regards,
Patrick
Molding -- Basic Box - Female mold
| |
Bertram31.com General Bulletin Board is maintained by Patrick McCrary with WebBBS 5.12.