
Molding -- Basic Box - Female mold
In this building tip, I will be building a quick, inexpensive, female mold to be used to produce
a battery box. This example could, however, be the same technique used for just about any
fiberglass container that has a cubical design. Water tank, fuel tank, water chest, or even
a dock box...
(date mold started 12/08/02 -- date first part was pulled 12/11/02) The function of the fiberglass box that you need will dictate the layup schedule and your selection of fabrics. The battery box I need will contain all three of the boat's batteries: Two 4D cranking batteries and one smaller house battery. The box will be installed in the center bilge between the engines on a 31' Bertram. 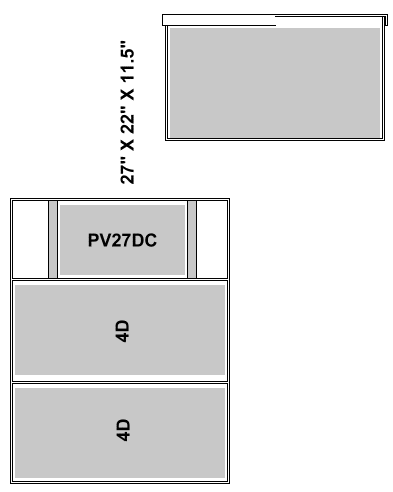
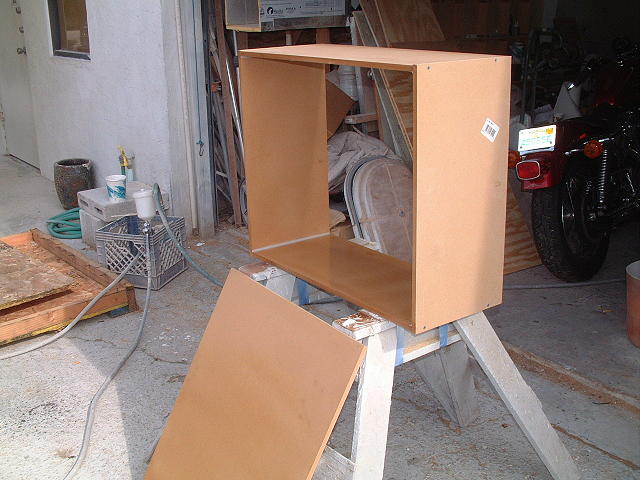
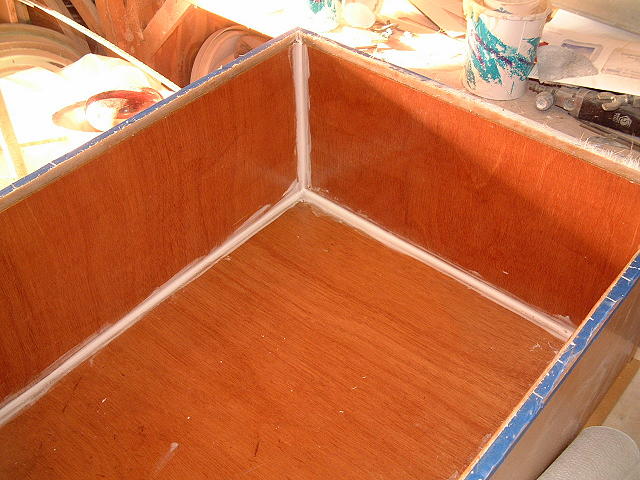
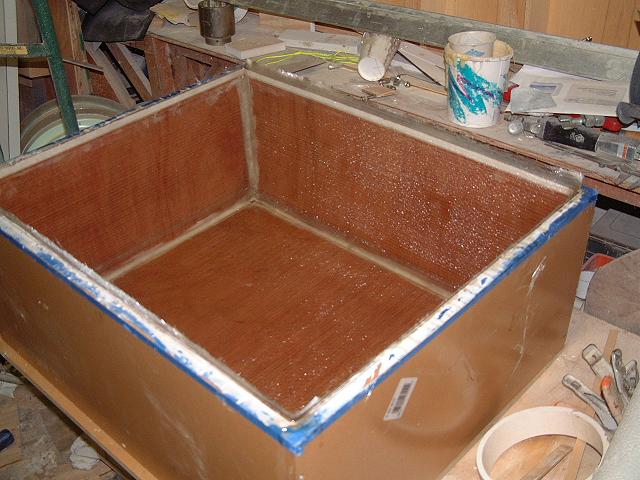
Since this will not need to be a production mold, capable of reproducing many parts, the design will be very straight forward, simple, and yet capable of reproducing as many as a dozen boxes if needed. The first step is to determine your needed dimensions and cut out the 5 sides. I'm using MDF board here, but plywood would also work if you don't have access to MDF. The MDF will save you many hours of filling sanding, and fairing, since the MDF is very true, has no grain texture, and is easily sealed. Here, the mold was made using three 2' x 4' pieces of 1/2" MDF from a home improvement center, at a cost of under $14.00. Like all molds and plugs, you must incorporate a slight positive draft so that the top of the mold opening is just a bit larger than the bottom. This will allow the fiberglass part to be removed from the mold without destroying it. On the two opposing sides that fit between the ends panels, I cut each end on a 88 degree angle. When fitting the pieces together, the sides are also allowed to slant inward on the short edge. This will result in my positive draft on all sides. After the box has been dry fitted, only the 4 side walls are screwed and glued into place. The bottom has been fitted, (it's what will dictate your box being square), but will be left as a removable piece. More on that decision later. The first image shows the 4 sided box getting finger wipe fillets in each corner. Fillets are important both to strength of the mold joint and in laying up the fiberglass. The also give a more attractive appearance to the corners of the finished box. 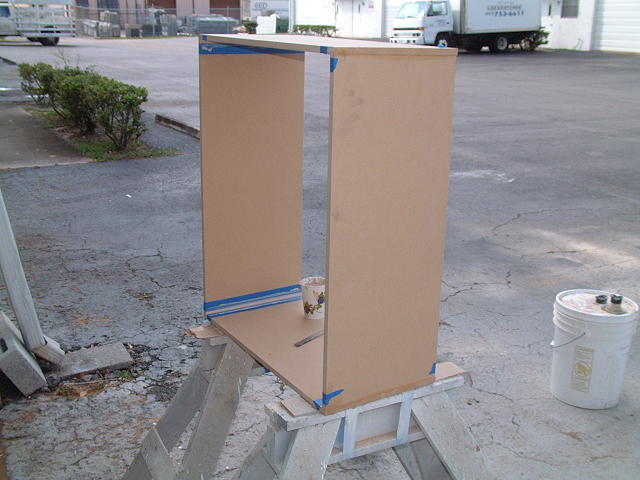 Notice that all of the corners were taped off prior to running the fillets. Tape slightly wider than the width
to be filleted and remove the tape immediately after running the fillets. This makes clean up and sanding much
easier and faster.
Notice that all of the corners were taped off prior to running the fillets. Tape slightly wider than the width
to be filleted and remove the tape immediately after running the fillets. This makes clean up and sanding much
easier and faster.
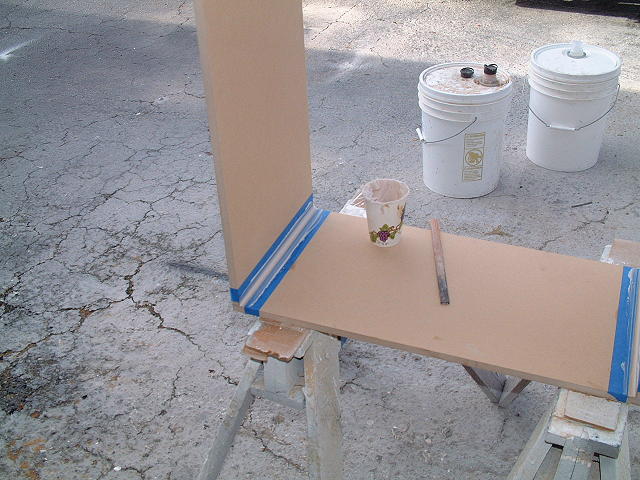 The fillets are built with a thickened mix of polyester resin. The resin is thickened in this case with equal parts of
cabosil and microballoons, and brought up to the consistency of mayonnaise. Be sure to prime your corners first with
un-thickened resin for a better grip to the MDF...
The fillets are built with a thickened mix of polyester resin. The resin is thickened in this case with equal parts of
cabosil and microballoons, and brought up to the consistency of mayonnaise. Be sure to prime your corners first with
un-thickened resin for a better grip to the MDF...
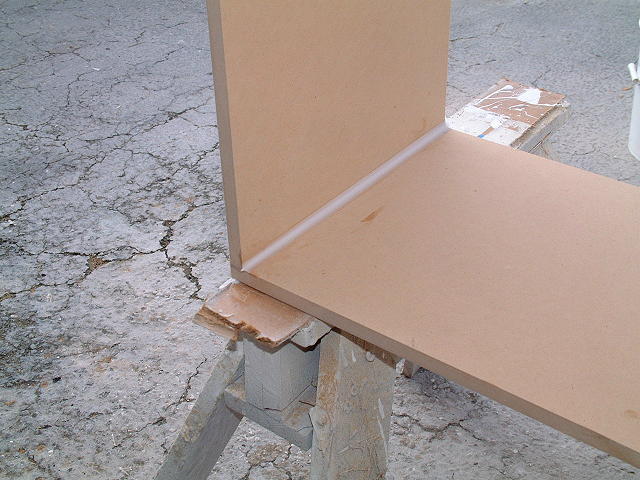 Here's a close up of the finished fillet just after pulling the tape. The fillets are sanded smooth and feathered in
after the resin has cured to point that it can be sanded.
Here's a close up of the finished fillet just after pulling the tape. The fillets are sanded smooth and feathered in
after the resin has cured to point that it can be sanded.
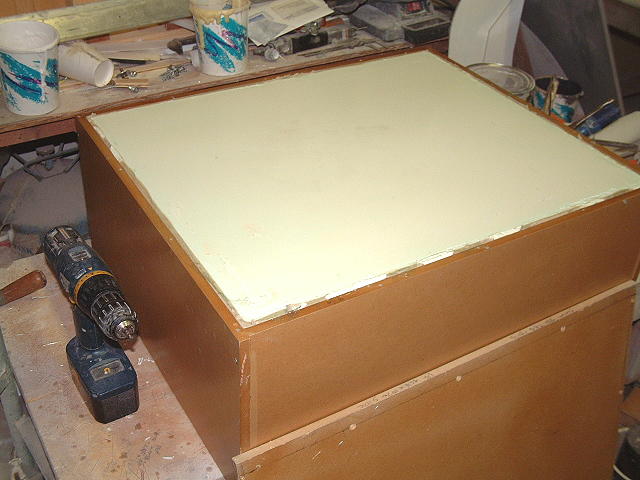
 After sanding the fillets, the box and it's bottom are sealed and prepared with polyester resin. This is done
in three steps and best done with a spray gun.
After sanding the fillets, the box and it's bottom are sealed and prepared with polyester resin. This is done
in three steps and best done with a spray gun.
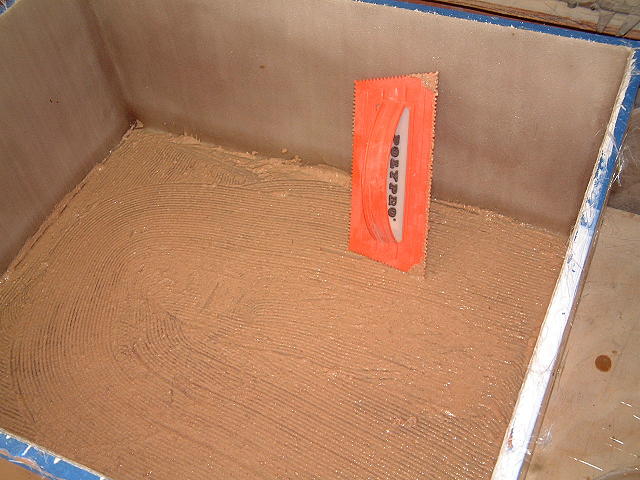
The first resin coat is thinned by 20% with top coat lacquer thinner for better penetration into the MDF.If you've done a good spray job, no drips, runs, or sags, there will be very little finish sanding needed to have a smooth deep surface of about 10 - 12 mils. In the case of my battery box mold, there will be no sanding done at all. This will leave a very slight texture to the gelcoated surface, but then it's a battery box down in the bilge. Cosmetics are not the most important issue here, saving the customer's money is... Method To My Madness:Most molds and plugs are designed with one or more air fittings. By injecting air between the mold and the fiberglass part, the part is literally freed for removal. Because of the simplicity of this mold and the projected installation of the fiberglass box, I'll just leave the base free. It will be screwed into place and the bottom seam will be filleted in using modeling clay.This technique is much faster and the lower corners don't need to be perfect. They will however be damn near it... Removal of the fiberglass part will be done simply by unscrewing the base of the mold and pushing it out. The clay can be cleaned off of the mold and it's ready for another part to be laid up when and if the occasion arises. Secondary uses: While this has been made as a mold for a battery box, the calculated volume, allowing for a 1/4" wall thickness is 6,326 cubic inches which would hold over 25 gallons of liquid. Holding tank? Water tank? Spare fuel tank? The fiberglass Battery Box:The finished mold is prepared by waxing on several coats of mold release wax, assembling it, and working in the clay fillets at the bottom joint. With the bottom removable, waxing is very easy and finger wiping in the clay fillets only takes a few minutes.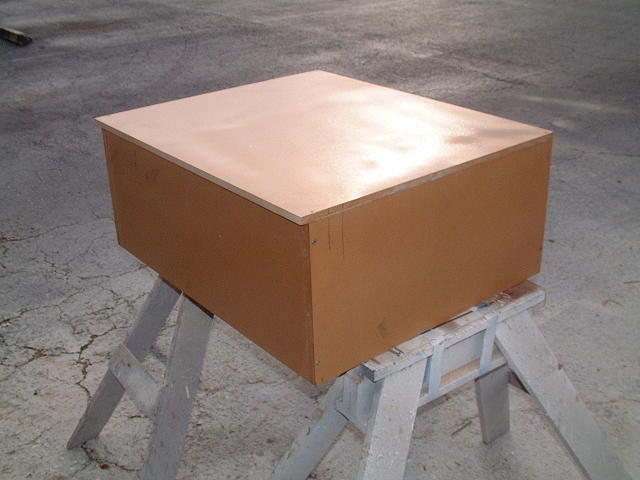 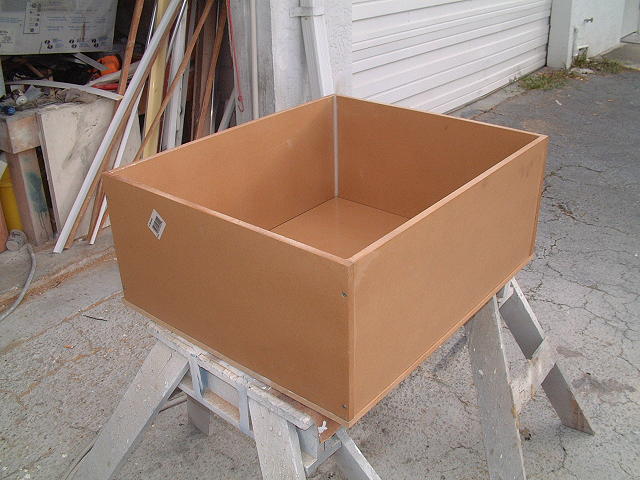
The layup schedule will be as follows: 1) Surface gelcoated to 24 mils (will shrink to about 20 mils)Final wall thickness will be around 1/4" and a two part cover will be fabricated from 3/8" clear acrylic. Below is a basic diagram of the lid sections and details.
Layup Begins: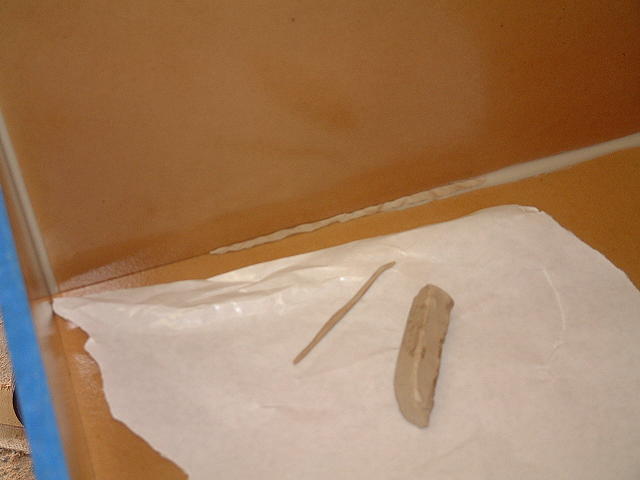 After several coats of PartAll #2 PVA mold release wax, the bottom is re-secured to the mold and the clay
fillets are built. I'm using a high grade modeling clay designed specifically for processes involving polyester
layups. It has very little oil content, is very consistent in texture, soft and has no coloring agent. Not your
kid's modeling clay, which may work, but I've never tried it...
After several coats of PartAll #2 PVA mold release wax, the bottom is re-secured to the mold and the clay
fillets are built. I'm using a high grade modeling clay designed specifically for processes involving polyester
layups. It has very little oil content, is very consistent in texture, soft and has no coloring agent. Not your
kid's modeling clay, which may work, but I've never tried it...
The fillet is constructed by rolling out the clay in sections about 5" long, pressing it firmly into the corner, and then working it into a smooth fillet by dragging it with the tip of my index finger.  Here's a little closer shot of the finished fillet. The slight inconsistency of the fillet width isn't important for
this application, but if you wanted a finer fillet, modify a plastic spreader to have the desired radius and go back
over it. After removing the excess clay, re-smooth the fillet with your finger tip.
Here's a little closer shot of the finished fillet. The slight inconsistency of the fillet width isn't important for
this application, but if you wanted a finer fillet, modify a plastic spreader to have the desired radius and go back
over it. After removing the excess clay, re-smooth the fillet with your finger tip.
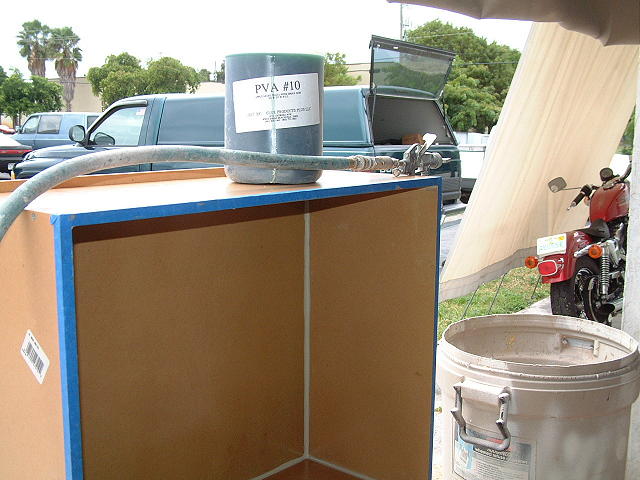 Once the fillet was to my liking, the mold was misted with multiple coats of PVA, (Poly Vinyl Alcohol), as a final
release agent. The PVA is applied with a jamb gun using 100 psi of pressure. Each coat is misted on and allowed to
cure for several minutes before adding the next coat. In all, I used about 10 oz of PVA for the coatings.
Once the fillet was to my liking, the mold was misted with multiple coats of PVA, (Poly Vinyl Alcohol), as a final
release agent. The PVA is applied with a jamb gun using 100 psi of pressure. Each coat is misted on and allowed to
cure for several minutes before adding the next coat. In all, I used about 10 oz of PVA for the coatings.
Caution: The PVA must be thoroughly cured and free of alcohol before applying the gelcoat. Failure to allow adequate curing time will result in the gelcoat wrinkling up. Allow at least 3 - 4 hours for the PVA to cure, more time if it's a humid day. Alcohol and polyester resin are not compatible! Also paint on extra PVA over the clay fillets. The oil in the clay will do the same thing to the gelcoat... The dry PVA is water soluble, but totally impervious to the chemistry of the polyester gelcoat or resin. Once removed from the mold, the part or the mold can easily be cleaned of the PVA residue with a wet rag. 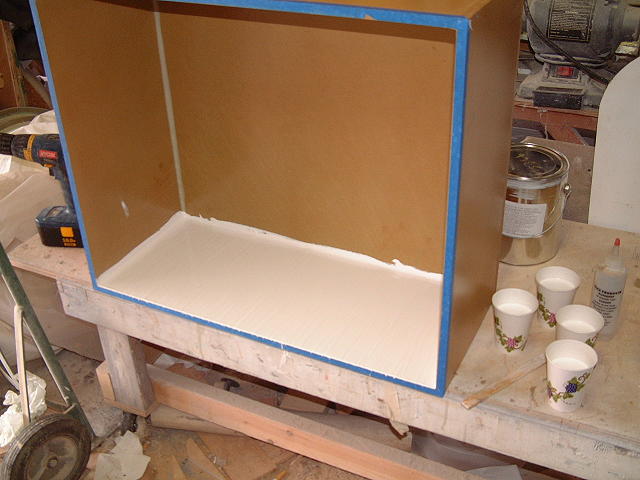 While spraying on several layers of gelcoat would have resulted in a more constant layer, conditions were not right for
spraying this day, so I elected to paint it in.
While spraying on several layers of gelcoat would have resulted in a more constant layer, conditions were not right for
spraying this day, so I elected to paint it in.
 For better consistency of the application, I am doing only one flat
surface at a time, pouring in about 7 oz of catalyzed gelcoat, distributing it evenly, and tipping out any air bubbles
with a 2 1/2" chip brush.
For better consistency of the application, I am doing only one flat
surface at a time, pouring in about 7 oz of catalyzed gelcoat, distributing it evenly, and tipping out any air bubbles
with a 2 1/2" chip brush.
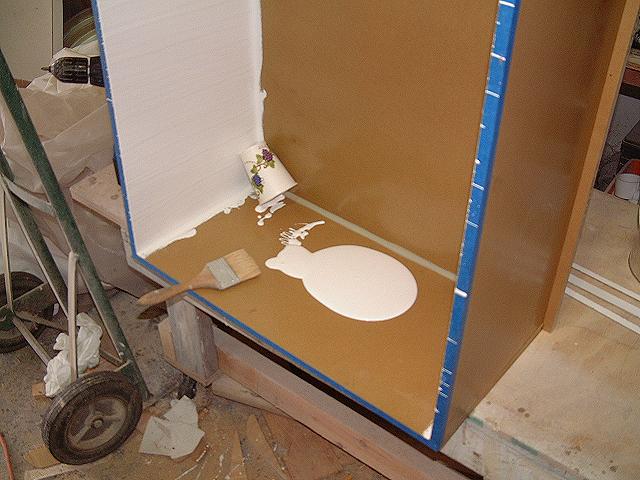
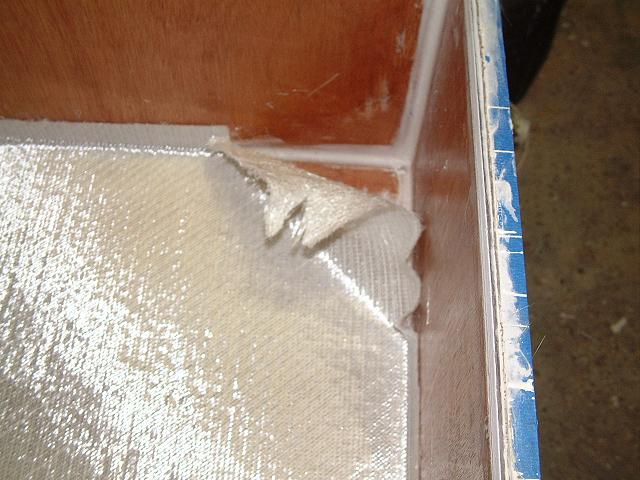
By slightly over catalyzing the gelcoat, each panel only needs to cure for about 20 minutes before it's gelled enough to turn the box to the next panel without causing a sag. In all the time comes out about the same as using a spray gun and applying 2 - 3 layers to achieve the thickness desired. Glassing It Up: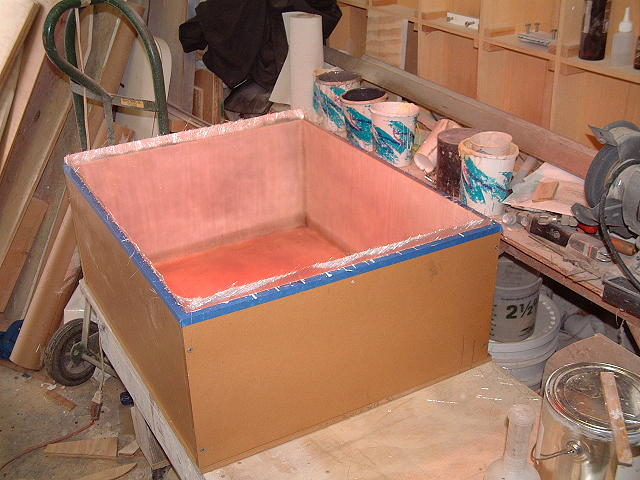 After the gelcoat has cured overnight, the first layer of 1 1/2 oz mat is laid up. This is the most important layer and must be very
well worked in without any air bubbles at all. I like to have this skin layer a little rich on resin, especially in the corners.
These are the areas that often have bubble problems while will leave a void between the gelcoat and fiberglass.
After the gelcoat has cured overnight, the first layer of 1 1/2 oz mat is laid up. This is the most important layer and must be very
well worked in without any air bubbles at all. I like to have this skin layer a little rich on resin, especially in the corners.
These are the areas that often have bubble problems while will leave a void between the gelcoat and fiberglass.
The skin layer should be allowed to cure until hard before laying up the next layer. 1 hour minimum, up to several hours depending on the catalyst ratio, ambient temperature and humidity. On this run, I did lay in 2 layers of the mat on the bottom since I had enough resin already mixed and just hate dumping excess over a few ounces. But only dealing with a single layer makes it easier to spot and deal with any bubbles. 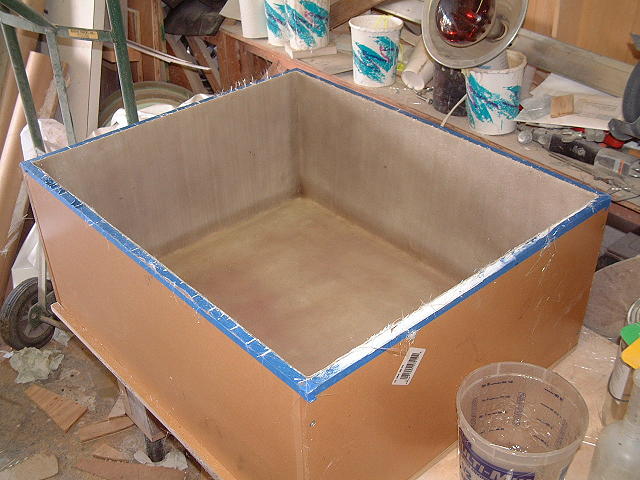 All layers and coring on this mold can now be worked in without waiting for further curing. The schedule from here will be:
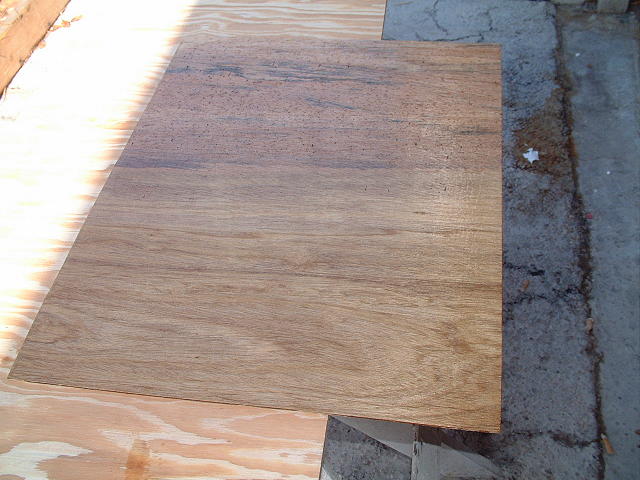
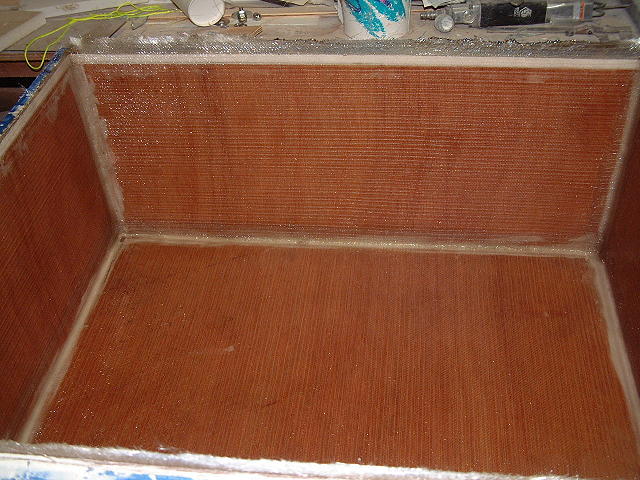
Another layer of 1 1/2 oz mat, followed by the 1/8" plywood core, followed by one layer of 1 1/2 oz mat, and finished up with one layer of 1208 biaxle fabric. Some additional lip reinforcement will be done at this time also. After the glass has cured for a few hours, the final step will be to gelcoat the interior. This application will have about 15% surfacing wax added so the the gelcoat will cure without remaining sticky. Notice that I'm keeping the top edge trimmed as I go. This greatly reduces grinding and truing later. The fiberglass is easily trimmed with a razor knife once it cures to a leathery stage. Use the mold edge as a guide.  With the second mat layer cured to a leathery stage, the pre cut and fitted core panels are ready to be bonded into the box. The
bond is achieved with thickened resin, to about the consistency of mayonnaise. The thickening used here is mostly fine saw dust
and some micro balloons.
With the second mat layer cured to a leathery stage, the pre cut and fitted core panels are ready to be bonded into the box. The
bond is achieved with thickened resin, to about the consistency of mayonnaise. The thickening used here is mostly fine saw dust
and some micro balloons.
 The "mud" is spread evenly and completely with a notched trowel. I want the core panels to seat down into the mud completely
with some squeeze out. This bond has to be relatively air free.
The "mud" is spread evenly and completely with a notched trowel. I want the core panels to seat down into the mud completely
with some squeeze out. This bond has to be relatively air free.
 Because the wood is porous, it is necessary to prime it
ahead of time with catalyzed resin. This will assure good penetration of the resin into the wood and convert it to a non-porous surface.
This is necessary to achieve the maximum bond strength between it and the fiberglass.
Because the wood is porous, it is necessary to prime it
ahead of time with catalyzed resin. This will assure good penetration of the resin into the wood and convert it to a non-porous surface.
This is necessary to achieve the maximum bond strength between it and the fiberglass.
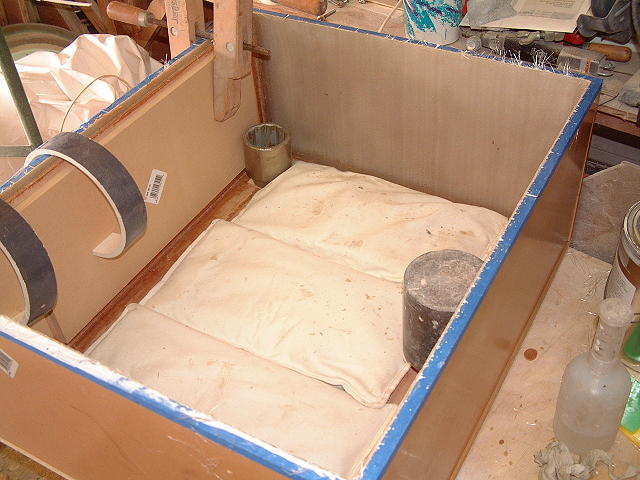 The panel(s) are laid into the mud, rolled down with a solid roller, then clamped lightly or weighted down to hold them firmly in place
until the resin kicks. Don't attempt to do all or too many panels at once. Concentrate on making the bonds as air free as possible and
filling in along the edges of the panel(s) with the filler.
The panel(s) are laid into the mud, rolled down with a solid roller, then clamped lightly or weighted down to hold them firmly in place
until the resin kicks. Don't attempt to do all or too many panels at once. Concentrate on making the bonds as air free as possible and
filling in along the edges of the panel(s) with the filler.
 As soon as the mud has hardened beyond the leathery stage, remove the clamps and weights. With a razor blade and any other tool that
conveniently works, scrape away all excess mud and high points. Again. cleaning up at this stage saves time and energy later. Once
the mud has hardened fully, high points will have to be sanded down.
As soon as the mud has hardened beyond the leathery stage, remove the clamps and weights. With a razor blade and any other tool that
conveniently works, scrape away all excess mud and high points. Again. cleaning up at this stage saves time and energy later. Once
the mud has hardened fully, high points will have to be sanded down.
 Here the third core panel is bedded and clamped. Notice that the core panel is being left about 1/2&qout; below the top edge of the box.
This space will be filled with a strip of pre-made fiberglass sheet the same thickness as the core. This insures that the top edge is
solid fiberglass. Between this strip and the next layer of biaxle, the core will be completely encapsulated in the fiberglass.
Here the third core panel is bedded and clamped. Notice that the core panel is being left about 1/2&qout; below the top edge of the box.
This space will be filled with a strip of pre-made fiberglass sheet the same thickness as the core. This insures that the top edge is
solid fiberglass. Between this strip and the next layer of biaxle, the core will be completely encapsulated in the fiberglass.
 Now that all of the core panels are in place, the joints are further cleaned with the razor blade, and after everything is back to
smooth, the inside core is primed with resin.
Now that all of the core panels are in place, the joints are further cleaned with the razor blade, and after everything is back to
smooth, the inside core is primed with resin.
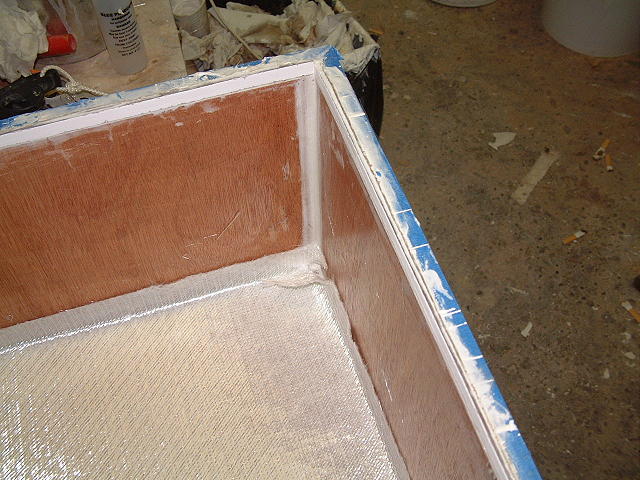
 As soon as the primer has cured to the "just tacky" stage, the joints are filled and the finger wipe fillets are re-established using
only micro balloons to thicken the resin, to about the consistency of peanut butter. This will make them very easy to touch up with 8 grit sand
paper in a couple of hours. They were also pre-wiped smooth with a paper towel wetted with acetone to further reduce labor time.
As soon as the primer has cured to the "just tacky" stage, the joints are filled and the finger wipe fillets are re-established using
only micro balloons to thicken the resin, to about the consistency of peanut butter. This will make them very easy to touch up with 8 grit sand
paper in a couple of hours. They were also pre-wiped smooth with a paper towel wetted with acetone to further reduce labor time.
 The 12 oz,(1208), biaxle fabric is a 90 degree weave on a 45 degree axis and is backed with a layer of 3/4 oz mat stitched to it.
Biaxle fabrics are much stronger than a standard 90 degree roving weave and have less tendency to warp. The mat side is usually
faced down when laying it up. The next three images explain how to wrap the corners for a flat fit.
The 12 oz,(1208), biaxle fabric is a 90 degree weave on a 45 degree axis and is backed with a layer of 3/4 oz mat stitched to it.
Biaxle fabrics are much stronger than a standard 90 degree roving weave and have less tendency to warp. The mat side is usually
faced down when laying it up. The next three images explain how to wrap the corners for a flat fit.
 The corners are cut diagonally so that one tab can over lap the other.
 First tab laid into place
 Second tab laid into place.
 The biax has been laid up, starting with the bottom layer, then up-ending the mold to lay one side panel. Each of the other side panels
are done by rotating the mold 90°.
The biax has been laid up, starting with the bottom layer, then up-ending the mold to lay one side panel. Each of the other side panels
are done by rotating the mold 90°.
 Since the panels are relatively small and the 1208 is relatively light, the tightly squeegeed wet
layup poses no problem holding a vertical or inverted position while the working panel is being done.
Since the panels are relatively small and the 1208 is relatively light, the tightly squeegeed wet
layup poses no problem holding a vertical or inverted position while the working panel is being done.
 The layup was started at 08:00 and completed at 19:15 on the same day. Actual labor time was right at 4 hours with an elapsed time of
11 1/4 hours. Weight of the box, out of the mold is 19.5 pounds.
The layup was started at 08:00 and completed at 19:15 on the same day. Actual labor time was right at 4 hours with an elapsed time of
11 1/4 hours. Weight of the box, out of the mold is 19.5 pounds.
 Removal from the mold was very easy and far quicker than most of my blow out molds. (Note the green PVA film separating at the
top left hand side of the box. A quick wipe down with a wet rag will dissolve the PVA. Beautiful stuff !)
Removal from the mold was very easy and far quicker than most of my blow out molds. (Note the green PVA film separating at the
top left hand side of the box. A quick wipe down with a wet rag will dissolve the PVA. Beautiful stuff !)
 The rigidity added by the 1/8" door skin core resulted in nice straight free top edges. The warpage deflection on the
long side was less than
1/16" at the center. Without the core, this deflection would has be upwards of 3/4"
The rigidity added by the 1/8" door skin core resulted in nice straight free top edges. The warpage deflection on the
long side was less than
1/16" at the center. Without the core, this deflection would has be upwards of 3/4"
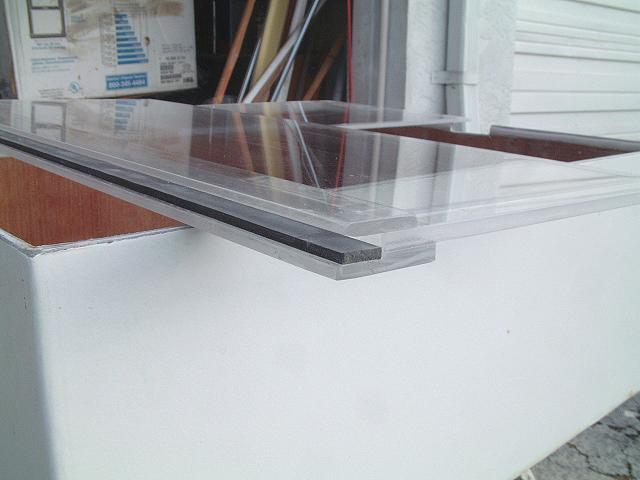
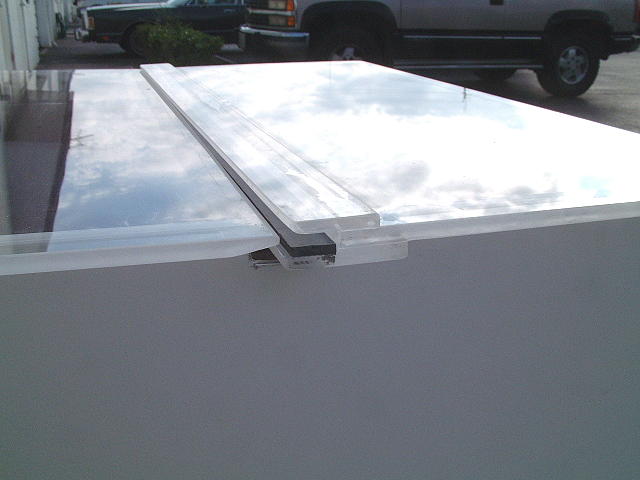
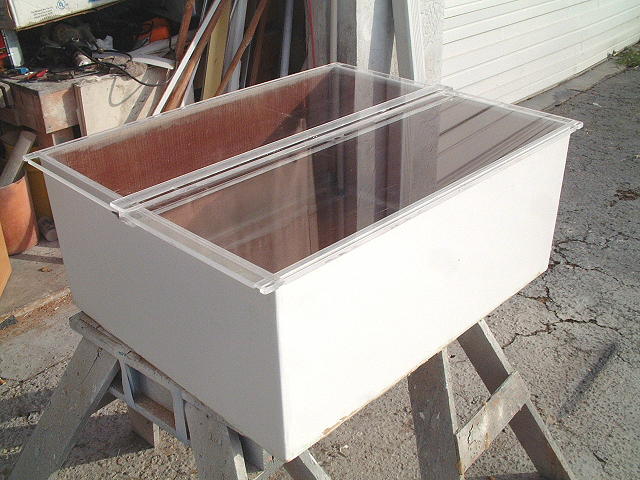 The 3/8" clear acrylic top is fitted and in place. The top is a 2 part unit which will be able to be easily removed from
the limited space between the hatch plate rails. The lid is dadoed around the edge to fit over the box rim and not shift position.
The 3/8" clear acrylic top is fitted and in place. The top is a 2 part unit which will be able to be easily removed from
the limited space between the hatch plate rails. The lid is dadoed around the edge to fit over the box rim and not shift position.
 The 2 lid parts are secured in a gasketed joint configuration and when in place, the male section compresses onto a neoprene
gasket to exclude any water that drip down between the hatch covers.
The 2 lid parts are secured in a gasketed joint configuration and when in place, the male section compresses onto a neoprene
gasket to exclude any water that drip down between the hatch covers.
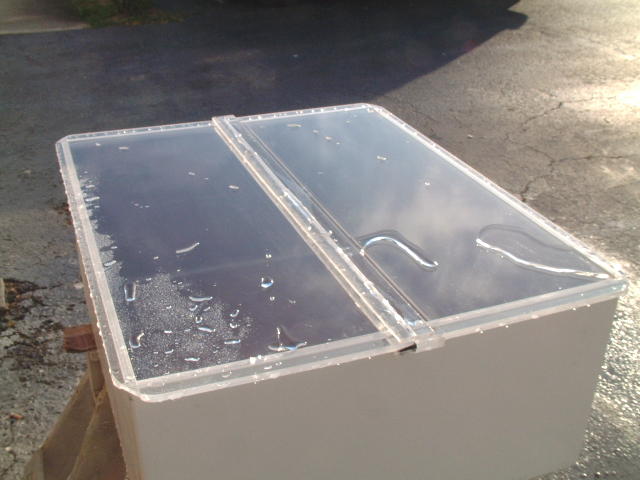 Finally, the closed lid was tested for leakage into the box by spraying it pretty heavily with the hose. Not a drop of water made it into the box. This was far more water and force behind it than the box will see below the companionway hatch plates.
Final Mounting The final mounting will not be done until after the engines are in and I am ready to drop the batteries in. Stay tuned...
Have fun! Feel free to download and print this article, but please don't use it on a website without linking it to Bertram31.com. Capt Patrick McCrary Bertram31.com 834 Scott Dr., LLANO, TX 78643 Telephone 325.248.0809 Web site questions or comments to: bertram31@bertram31.com |