Bertram31.com
Vacuum Bagging of fiberglass and resin parts is becoming a widely accepted and useful tool.
From solid glass lay ups to complex composite structures, vacuum bagging is a technique that should, and can, be
explored by even the novice boat builder. This will be the first of a two part article and will only touch on the basic elements of the technique. Later I will add a practical section of the process in actual use.
The principle behind vacuum bagging is that of using atmospheric pressure as a tool. At sea level, one atmosphere weighs 14.7 psi (pounds per square inch) or 29.92 inches of mercury. In the absence of a vacuum,
a surface has atmospheric pressure exerted on all sides and is equal. When a vacuum is generated on one side only, the result is an increase of pressure on the other side equal to the amount of vacuum being generated. A
one square foot area is receiving 2,116.8 ponds of pressure with a 29.92" Hg vacuum beneath it...
Necessary Equipment and Supplies:
Vacuum Source:
There are three principle ways to create a vacuum.
- Pumps
- Generators
- Vacuum Cleaners
A vacuum pump is perhaps the simplest source and can be built from a number of readily available pieces of surplus equipment, including auto air conditioning pumps, freezer compressors, and general air compressors.
The only difference between a compressor and a vacuum pump is which side of the unit is being used. Vacuum pumps use the intake side and compressors use the output side... Your shop air compressor can
even be called upon to do double duty.
Vacuum generators are dependent on compressed air passing through a venturi to create vacuum. The advantages of a vacuum generator include:
- Intermittent operation while maintaining a set vacuum rate
- Somewhat quitter operation
- Lighter and less space consuming
The disadvantages are expense and lower volume duty
Another source is the use of a shop vacuum, but the amount of vacuum available is far below that of a pump or generator and the noise level is excessive. It is however a good way to experiment with the technique before spending a
lot of money...
Containing the vacuum can be done with a variety of non porous sheeting materials, including polyethylene, nylon, and high stretch rubberized sheeting. The polyethylene
sheeting is available at a local builder's supply, such as Home Depot. The others are available from certain composite materials suppliers. (See Supplier List below.)
Your choice of vacuum bagging material will depend on the nature of the item that you are bagging. For simple flat work, the polyethylene sheeting can be an inexpensive and
very workable material. For more complex items, the nylon and high stretch material will be a better choice.
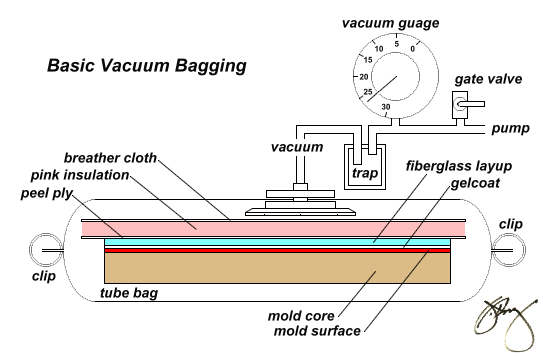
To obtain the best results there must be an avenue to supply an even vacuum to the whole part. The most convenient way is with the use of a breather layer between the bag and the part. This will also necessitate the use of
release barrier between the breather and the part. The most convenient material for this is a treated nylon called Peel Ply.
Breather cloth is available and looks and feels somewhat like spun cotton. For smaller items, it will be adequate to distribute the vacuum. For larger items it may be advantageous to increase the thickness of the breather layer, and
regular fiberglass building insulation is an inexpensive bulk material.
An additional advantage to increasing the breather thickness is that surface irregularities caused by the folds and creases in the bag while under vacuum will not be as readily transferred to the part.
The bagging material can be in the form of a flat sheet, a tube, or custom built to fit the the specific part. In all cases the bagging should be very loose fitting in order to easily conform to the item being bagged. Too tight a fit will
cause bridging at corners and elevations, thereby not transferring full pressure. This will lead to voids and incomplete laminations.  In the top drawing, a tube is indicated with the ends sealed off by way of special clips. Below, a flat sheet of bagging can be taped down to the work surface.
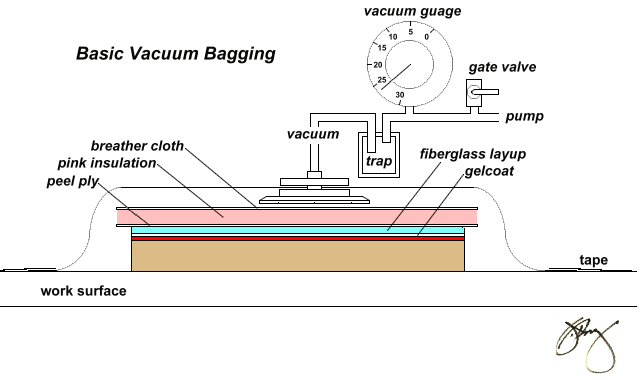 |
Configuring a vacuum pump should include a means of an air tight piercing of the bag where the vacuum is to be drawn, a trap so that resin cannot be drawn into the pump, a vacuum gauge, and a relief valve to regulate the level of vacuum being pulled.
A specially designed fitting is the best way to pierce the bag. Available from most sources of vacuum equipment and supplies, this two part fitting is easy to use and well worth the minor expense... The trap can be purchased or made from
a sealed jar with two fittings added to the lid. A standard plastic bodied screen filter can also be used.   The vacuum gauge can be purchased through a source such as W.W. Grainger or at GaugeStore.com. Cost should be under $10.00...
The relief valve is a small ball valve available from Home Depot or the like... The relief valve is handy when first fitting the bag. By adjusting it to allow only a partial vacuum, it is easy to manipulate the bag to better conform to the work
piece. Once it has been pulled and adjusted to fit everything as best as possible, the valve is closed and the full vacuum is applied.
The valve also comes in handy when laminating certain items that only need a small amount of pressure to be exerted.
Once you have all of the necessary items and your system configured, you are ready to experiment. Start simple and small. Test pieces done in polyester resin will progress quicker that those done in epoxy simply because of the faster cure rate that can be
obtained with polyester.
Some comparisons to make:
- Material thickness -- Vacuum lay up as opposed to hand lay up.
- Resin Content -- Vacuum lay up as opposed to hand lay up.
- Air Content -- Vacuum lay up as opposed to hand lay up.
Reasons to use vacuum:
- Better uniformity of lay up (No thick / thin cross sections)
- Stronger finished product (Higher glass to resin ratio)
- Better Strength to weight ratio
Draw backs to using vacuum:
- Increased labor time and materials
- Smaller cross sections (More layers required to duplicate hand lay up thickness)
Note that this last "draw back" can also be viewed as an asset. A thinner cross section of a vacuum bagged lay up is in reality quite stronger and lighter than a resin rich hand lay up.
Recommended Suppliers:
Have fun! Feel free to download and print this article, but please don't use it on a website without linking it to Bertram31.com.
Capt Patrick McCrary
Bertram31.com
site creation and maintenance by:Capt Patrick McCrary
©
834 Scott Dr., LLANO, TX 78643
Telephone 325.248.0809
Web site questions or comments to:
bertram31@bertram31.com
|