
High performance shafting and installation:
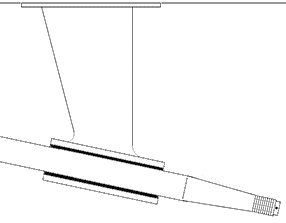
High performance shafting and props must meet some basic specifications in order to obtain the maximum efficiency and to avoid damage to either the shaft or the boat. This section is concerned only with inboard powered planning boats. Regardless of the amount of power, these basics will hold true, but specifically they become very critical with diesel boats of 200 hp or greater and with gear ratios of 1.4:1 or greater. Lower ratio gears, (1.4:1 or less), and when coupled with gasoline engines usually don't require special shafting and a standard 303 stainless steel shaft of the proper diameter will be sufficient. However, when the combination is diesel and the gear ratio is higher than 1.4:1 a stronger shaft material and/or diameter will be needed to handle the heavier torque. Even high RPM 4 cycle diesel engines will develop greater torque than will a comparable horse power rating for a gas engine. The most common problem with inadequate shafting is fatigue fractures and ultimate failure of the shaft between the strut and the front of prop hub. Failure can also happen due to improper mounting of the prop and/or too much shaft length between the aft end of the strut and the forward face of the prop hub. The following diagram shows minimum clearances in regards to the prop and the boat and rudder's leading edge. The prop blade clearance to the hull is critical to prevent the hull from being eroded from the prop action. Minimum prop to rudder blade clearance is important so that there is adequate water force striking the rudder to have good steering response. Perhaps the most critical measurement shown is the maximum length of the exposed shaft between the strut and prop hub. This is one of the major areas of shaft failure. As this length exceeds the diameter of the shaft, so does the flexing and stress of shaft aft of the strut bearing. 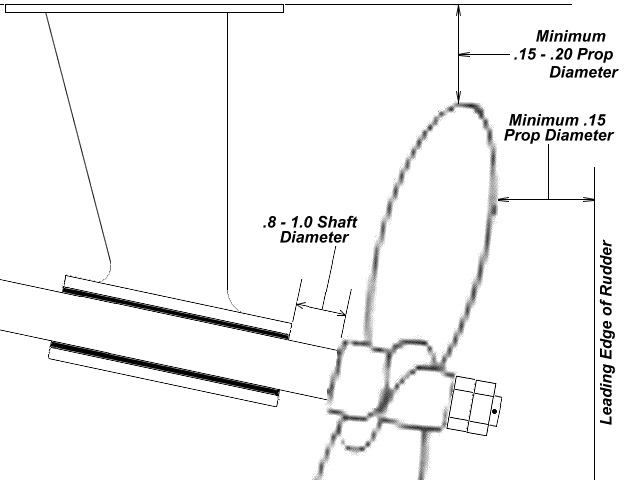  As stated before, diesel power and higher gear ratios require higher strength shafts. The loss of a shaft due to breaking behind the strut is not an uncommon event but can be minimized by using the correct shaft material, assuring that the strut to prop dimension is correct, and by using care in mounting the prop to the shaft. I recommend the Aquamet 19 or 22 as being the best for longevity and ability to absorb stress. Basic shaft characteristics: Standard 303 or 304 stainless steel shafting: Approx. 100,000 P.S.I.(Another manufacture similar to Aquamet is Aqualoy by Western Branch Metals)(Good economy shafts) Figure on replacing every few years... Note that how the key way is cut into the shaft is of extreme importance! If the machine shop cuts the key way with sharp inside corners there will be the potential for fractures and failure. It is probably not a case if "IF", but "WHEN"... The key way must have a small fillet at the inside corners and the outer corners must be rounded over slightly. 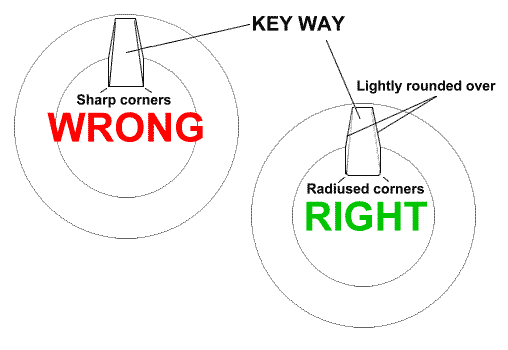 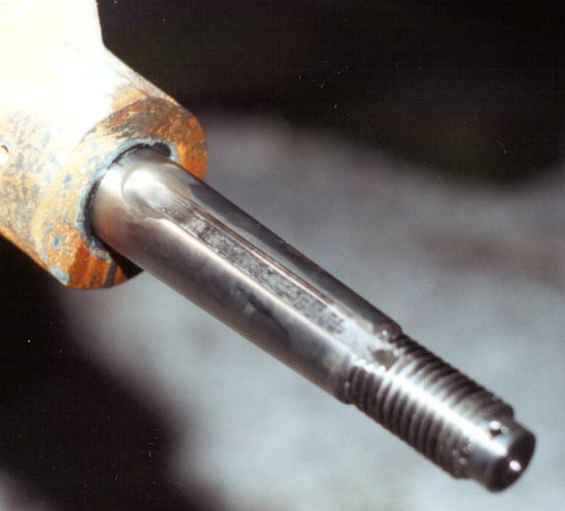 "Spooning" is another technique that can help reduce the chance of shaft damage in this area. Spooning is done by grinding out and polishing the upper end of the key way so that torsional forces are more widely distributed.  Another culprit of shaft fatigue and failure can be how the wheel is mounted. The wheel hub should fit all the way to the beginning of the tape to take full advantage of the shaft diameter. The further down the shaft it fits, the smaller the diameter of the shaft. The wheel should lapped very well onto the shaft so that both surfaces are well mated and the wheel fits fully onto the taper. Often a new shaft and/or a new wheel will have very small tooling marks that prevent an absolute matched fit. While the wheel seems very tight upon installation, in fact it may be a couple of thousandths out. During the first full power run in forward, the wheel will be driven higher onto the taper. Conversely, on the first higher speed backdown the wheel will return to it's original position against the shaft nut. this minute back and forth action will cause the shaft key to act as a driving force. Note that the shaft/prop key is NOT meant to be the driving force. While it will prevent the prop from slipping under extreme circumstances, the frictional force between the hub and the taper on a properly seated and tightened prop is the real driving force and distributes the load over a large surface area. The momentary slamming from side to side of the key will eventually fatigue the shaft and cause a fracture. Also, never use a stainless steel key in the prop end of the shaft, use a bronze key which is more forgiving in case you run aground or strike some other submerged object with the wheel... One way to assure that the wheel is firmly at the top of the taper is to take the boat out, run it up to cruise speed, back it off slowly to idle speed, do an aggressive acceleration and return, being careful not to do any reverse at over an idle RPM. Re-haul and re-tighten the shaft nuts. Another way is to tighten the wheel as tight as possible initially, remove the nut, then use a heavy short section of pipe that will clear the shaft and with a heavy machinist sledge drive the wheel to the max. Use a piece of PCV pipe as an insulator between the shaft and the drive pipe to prevent marring the shaft. Replace and retighten the nuts hard... 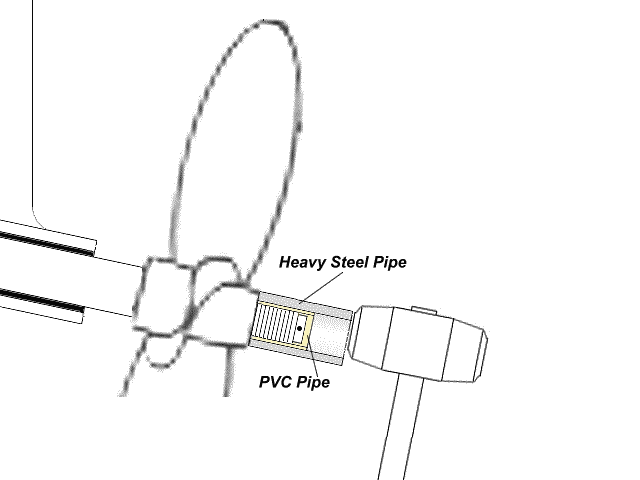 Additional Resources of Interest:
Finally, to further insure that you don't loose a prop to shaft breakage, (never a convenient occurrence...), every time you haul for a bottom job, pull your props and dye test the shafts. This is a simple and inexpensive process using a special thin liquid purple or red dye. It's liberally applied to the clean shaft and then wiped away. Any fractures will immediately show as thin purple or red lines. If seen, replace the shaft... Have fun! Feel free to download and print this article, but please don't use it on a website without linking it to Bertram31.com. Capt Patrick McCrary Bertram31.com 834 Scott Dr., LLANO, TX 78643 Telephone 325.248.0809 Web site questions or comments to: bertram31@bertram31.com |