


|

Installing |
Fun part finally begins...
Up until now, everything thing on this project has been stage setting; getting ready for the main act. Now the transformation from ugly duckling to swan can begin.
The teak decking lumber has been ordered in S4S in a standard dimension of 1 7/8" x 1/2" x 10 - 12'. Outboard of the hatch openings, the width dimension can remain standard. The width of the areas between the hatches and over the hatches themselves dictates that the lumber width be changed so that the spacing registers nicely with the hatch openings. (Remember that little strip of wood hanging onto the original hatch edge?)

By doing some tight measurements and double checking with scrap pieces, the width of the lumber to be laid can be determined.

Next, a starting point must be determined. This should always be based on the center line of the deck. Make this measurement carefully!
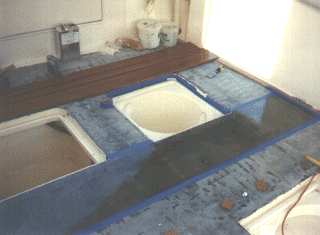
The two boards which transverse the cockpit are dry fitted and will be the last boards to be epoxied down, but, in the mean time, act as length guides for the rest of the fore to aft run.

*NOTE: The curved transom board will be the only board in the new deck that has screws applied and they, (7 of them), will be installed from under the deck and extend only an 1/8" up into the wood. This serves two purposes; 1. it locks the board into the dry fit position and 2. once the board is finally epoxied down, it keeps the memory of the board from creating a shear force to the epoxy.
With the transverse boards set, the first section of the deck can be dry fitted and prepped for installation.

You will note that I use common all weather deck screws and fender washers to temporarily secure the boards down. The screws also act as spacers. I space the screws out about every 12" so that an equal pressure is distributed through the length of the board and to assure that the board remains true to the center line.

Before the section is ready to epoxy down, the area of the deck and the backs of the boards must be thoroughly cleaned with denatured alcohol,
 
then fresh coated with straight epoxy, (no thickening added).

While you have this image in view, take time to notice that all of the boards have two 45 degree saw kerfs, angled outward, at a depth of 1/8". This adds both surface area for the bond and a locking mechanism.

Let the straight epoxy on the deck and back of the boards cure to the point that it is tacky. This straight coat will penetrate the pours and be an excellent "lock" coat for the thickened epoxy that will be applied.
Mix an amount of straight epoxy and thicken it to the consistency of mayonnaise, using cabosil and milled fiber, (I use a ratio of about 70% cabosil and 30% milled fiber).

Apply this mix to the back of the boards using a plastic spreader. Make sure that the saw kerfs are completely filled and that the entire surface of the board is covered with a film approx. 1/16" thick.

Each board in the group is now returned to is dry fit position and screwed back down. Hand tighten the screws only to a snug tension so as not to squeeze out all of the thickened epoxy.

As soon as the last board in the group is down, go over all of the spaces between the boards and remove ALL excess epoxy. I find a wooden kitchen match to be an excellent tool for this purpose. Be sure to get around the screws and under the fender washers!

OK! Once all of this section is down, clean up your mess, put the tools away and take the rest of the day off!
You'll let the epoxy cure over night, but not longer than 12-18 hours before removing the screws and doing some more clean up between the spaces.
As a rule of thumb, it takes about 4 hours to lay a 6-8 board section if you're working by yourself. Never try to lay more than 10 boards per section if you're alone; you just don't have the working time necessary before the epoxy starts to kick. Once you have the first section down, you can work a new section on both sides of the first and this is where 2 workers can really start cutting down the length of time to get the job done. Each person works a section.

site creation and maintenance by:Capt Patrick McCrary
© 1999-2002, www.usamarine.net
3640 Investment Ln. #15, West Palm Beach FL 33404
Telephone 561.848.3366
Web site questions or comments to:
bertram31@bertram31.com
|
|
|
|