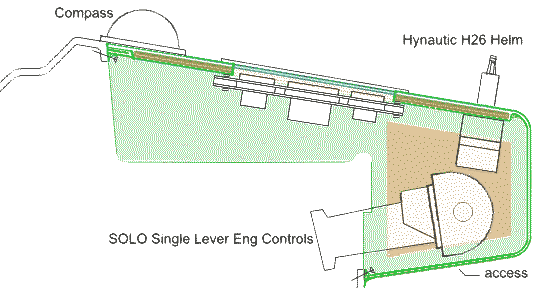
Bridge Console - Working Drawings
Installation Guidespecific details for Adrian Mercado 2/19/2000
 |
 |
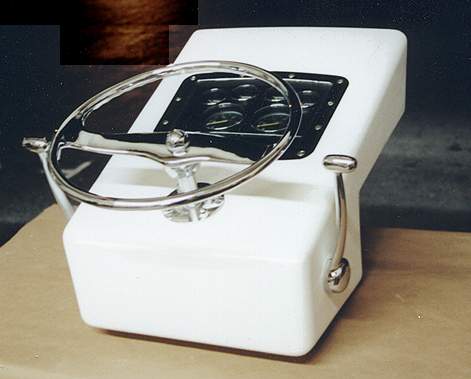
This console will have to be fitted to the individual boat, but should only require very minor adjustments where the edges meet the original design. But not to worry... You will be filleting all of the joints, excepting the top joint where the console ties into the combing.
 |
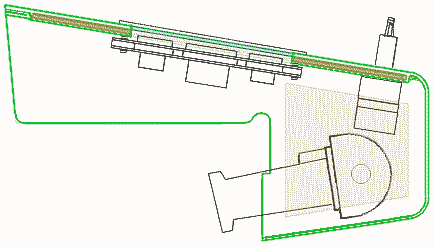
The drawing below is a simple illustration of what will be cut away from the original dash and combing. Do not remove the vertical lower cabinetry sections, you need them to support the dash and keep every thing tied down while installing the console bubble.
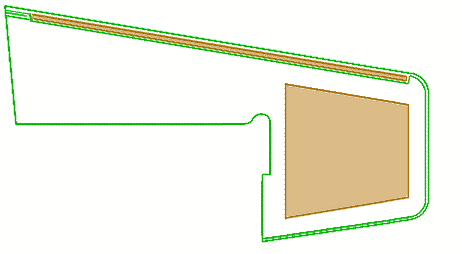
Before cutting anything, get the bubble fitted into place and trace around the entire outer edge. Remove the bubble, and measure in from that line 1 1/2". This will be your cut line.
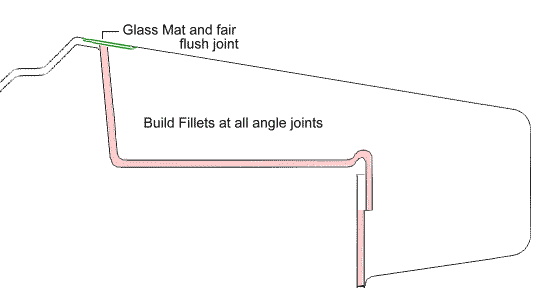
Take a few minutes to clean up and smooth the fiber glass edges of your cut at this time. Once you epoxy the bubble into place, it'll be very difficult to do this, and sooner or later you'll have your hands under the bubble and be cussin' and bleedin'.
If you're installing our console bubble, you'll notice that the edges are tapered. This has been done to allow for a better fairing of the fillet line, and increase the surface area of the fillet. If you are building you own bubble, it is recommended that you taper the edges from 50% to 0% over a span of 1". If you've cut out leaving the 1/4" over hang inside the bubble, add as much fillet as possible here also.
 |
While your epoxy bond and fillets should supply all of the strength ever needed, it isn't a bad idea to carefully pre-drill and screw, from the under side through the original fiberglass, into the edge of the bubble. Perhaps one #8 SS screw every 3" or so, where you can reach. Nothing wrong with a little over kill!
 |
 |
Fillets in general
Fillets are the strongest reinforcement that can be added to a angled joint. As illustrated in the following diagram, the surface area of the bond is greatly increased, by the two contact sides of the fillet. The amount of this increased surface area is dependent on the radius of the fillet and the area of the primary bond line. The greater the radius of the fillet, the greater the increase in strength.
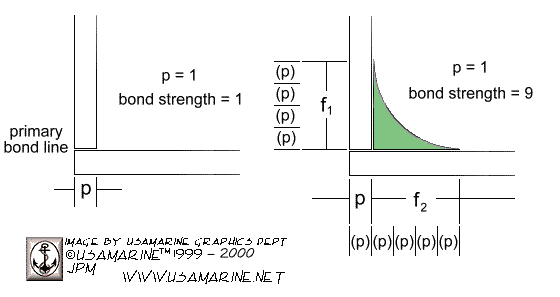
Let's say that in this case the bond line is 1/4" wide and 12" long, giving a primary bond surface of 3 square inches. By adding a fillet with a radius of 1", the bond strength is increased by a factor of 9 times, or 27 square inches.
The radius of the fillet should be at least equal to the width of the primary bond line, which would yield an increase of 3 times the strength without the fillet. Less than this, while it still increases the strength of the bond, the fillet becomes more cosmetic than structural.
Large radius fillets should be build up in stages, where as small radius fillets can be added in as little as a single step.
This excerpt is from instructions on installing a custom console bubble on a Bertram 31. Looking beyond some of the specific project elements, I thought that some good insights might be gained by all who are working, especially for the first time, with epoxy and fillets.
As with all of the tips in this section, it is more of a "snapshot", than an in depth explanation of technique.
Tips on bonding and making fillets with epoxy:
A clean rough surface is prerequisite to assuring a good bond. Use #80 grit sand paper to thoroughly cut into the surfaces to be bonded. Do not bond directly to polyester gelcoat. While epoxy will have no problem bonding to the gelcoat, the bond of the gelcoat to the fiberglass layup should not be trusted. Cut all the way through the gelcoat into the glass.
Who ever said "cleanliness was next to godliness" must surely have been knowledgeable about epoxy bonds. Clean all of your sanded bond surfaced well with denatured alcohol and clean rags. This step can't be over stated.
Wet out all bond lines with un-thickened epoxy. You want the epoxy to penetrate all surface porosity and the sanding tooth. The epoxy you use to wet out should fairly thin, such as a layup resin. If you are using a thick 1:1 laminating resin to wet out with, thin it, after mixing, by 50% with denatured alcohol.
Allow the wetted out bond lines to tack up before proceeding. Depending on the ambient temperature and type of catalyst used, this should be between 2 and 6 hours. When touched, no visible epoxy should be on your finger, but the finger should be sticky now. Call it the "sticky finger test"...
Next, preferably using a 1:1 ratio laminating resin, mix a batch of epoxy and thicken it to the consistency of peanut butter. Use cabosil and milled fiber glass as the thickening agents at a ratio of 1 part cabosil and 1 part milled fiber. Apply a bed of the thickened epoxy to the boat side of the bond line, and position the console bubble into place. Clamping should not be necessary, but if deemed so, use the lightest clamp pressure possible. Epoxy is at it's strongest with a slight gap between the two surfaces.
Work in this mix to any remaining gaps, and wipe away the excess. You should have a very small fillet remaining. Allow the installation to set up over night, or until the epoxy has cured past the sticky stage. Note that the strongest epoxy bonds come from a slow setting, low ratio mix. Don't be impatient and try to use a fast setting epoxy.
You can apply fresh epoxy over cured epoxy, so long as it is done within a 24 hour period, without sanding. Wipe all surfaces down again with denatured alcohol and clean rags.
The next application will be to start building your fillets. Again, use the thick laminating resin, cabosil and milled fiber mix that you used for the bond. Using a rounded tip tool, such as a tongue depressor, build in a solid fillet all the way around the console bubble. Clean up any excess epoxy while it's still un-cured. Cabosil and milled fiber sand like steel and you won't like the chore!
After this has cured to the point of being hard, shift your thickening mix to a medium density filler and cabosil. Repeat the filleting run as before, but with a larger radius tool tip. The idea is to gradually build up the radius of the fillet. Allow this to run to fully cure, a couple of days at least. Epoxy goes through about 95% of it's shrinkage in the first 48 hours. Sand everything down smooth with #80 grit sand paper. Remove as much of the bumps and lumps as possible.
Shift now to cabosil and a soft fairing filler, such as phonelic micro balloons. The cabosil can be cut back in ratio a bit, but is necessary to keep the mix from sagging. Again, use a larger radius tool to build the layer. Did I mention to clean up the excess? Some where along this point you may even want to start masking off the surrounding areas. This will also leave you a bit of a raised edge which makes feathering the fillet into the adjacent surfaces easier. Allow a two day cure on this run also. "Yes, Dear, I know you're anxious, but be patient!"
Hint: Pull the masking tape off carefully, before the epoxy cures, but after it has firmed up enough to stop sagging. About the consistency of soft putty.
Sand this previous run down well. You should be at a pretty fair point. If you still have some irregularities to the fillet surface or shape, repeat the last step as many times as necessary to gain satisfaction.
Hint: On this last run, allow the epoxy to harden to the point that when you run you finger across it there is no sensation of stickiness, but if you stop you movement, the surface still has some tack left. Wet a soft, lint free rag with denatured alcohol and lightly rub the epoxy surface. You will effectively smooth and semi-polish it, making your final sanding a breeze.
Once satisfied with your craftsmanship, paint on two or three coats of un-thickened laminating epoxy, allowing each coat to tack up before applying the next coat. Allow the final coat to cure for a couple of days, and sand lightly with #180 grit paper, feathering all edges into the surrounding surfaces.
Epoxy degrades fairly rapidly under ultra violet light. Don't leave your hard earned fillets to bake in the sun. Put a coat of primer on all epoxied surfaces, spray automotive lacquer primer is fine. You'll re-sand in preparation to final primer and paint any way. ( Even the sun light on the North Pole has UV rays... It's not a temperature thing... It's a light thing.)
BACK TO INDEX
834 Scott Dr. LLANO, TX 78643 Telephone 325.248.0809
Web site questions or comments to: bertram31@bertram31.com