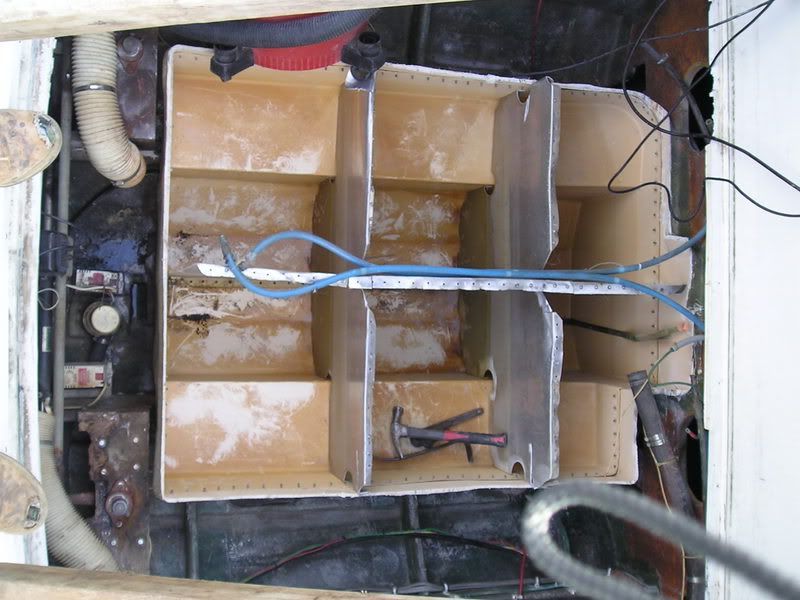
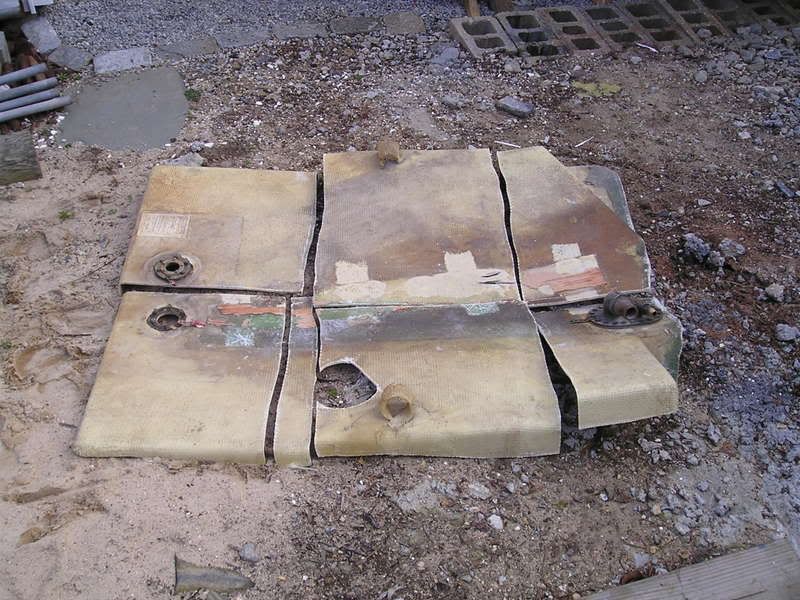
Here are photos of how the gas tank is made. This may help others with their tank removal. 1 shows the top cut out, 1 shows the baffels in place, 1 shows the baffels removed. A saw-zall did the most cutting with ease, a grinder did thiose hared to reach areas, a chisel and a drill did the rivits that held the baffels in place. I am leaving the bottom 1/2 of the tank in the boat and intend to install a smaller main tank [130 gallons?] into this shell and then install 2 saddle tanks [2x40gallons?] [if saddle is the correct term]. I figured the main tank will usually have 50 - 100 gallons in it so why have a large tank to collect condensation. I will also be installing a way to drain the tanks via an extra plug, pickup to the bottom, etc.
I figured on coal tar coating the tank. Cutting a drain hole in the rear bottom of the fiberglass tank for condensation draining. Shouls I install the tank on a bed of foam [bertram31.com] or will this hold dampness / aluminum rot.
Any suggestions would be greatly appreciated.
what good is a boat if you cant spend all your money and time you dont have working on it.
Did you notice any ethenol damage? The gel coat looks to be intact from the pictures as compared to what I saw at Carl Tanks and Raybo's boat yard. The gel coat was peeling off and the fragments were soft and gummy also quite a few soft spots in the tank itself.
I just finished draining the tank and pulling the engines so next up is tank removal. If you don't mind I'd like to stop over and see your project some weekend.
Don't lend a hand to raise a flag aboard a ship of fools!
This boat was on land for 5 years with an almost empty tank. I figure no ethenal in the tank. I dont want to wait for a problem tp show up at the worst possible time. You can see this project at any time.
what good is a boat if you cant spend all your money and time you dont have working on it.
Why couldn't you remove the tank top as you have, remove the baffles, refiberglass the tank interior and then re-install a repaired "lid" or a new lid using the cut up lid as a template?
I'm guessing the inside lid joint would be a problematic area...
I know that Raybo relined the interior of a 33's gas tank with some kind of ethanol resistant coating... Im not sure what that cost but I am sure that it isnt cheap...
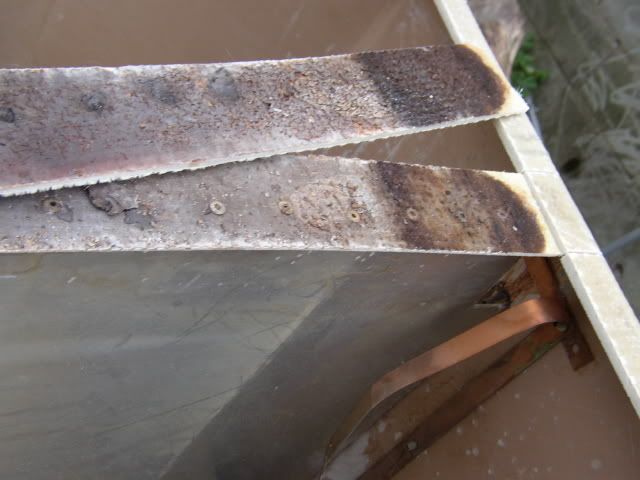
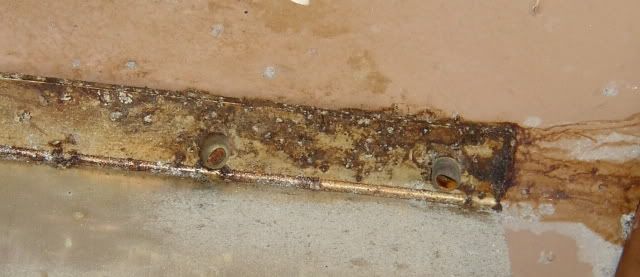
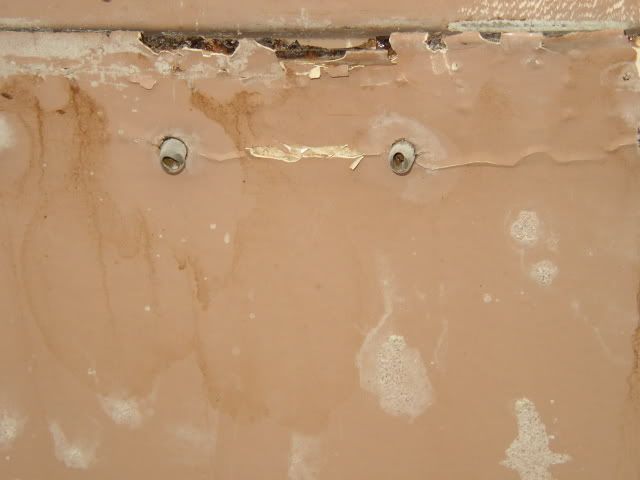
I just recently cut up my 1978 B33 tank. For the last few years I had been getting a lot of "coffee ground" material in my Racors. Upon cutting up the tank I found that those particles were from the rivets rusting. The rusting also allowed gas to penetrate BETWEEN the layers & start the delamination process. Once I cut out between the baffles, I was able to easily by hand pull the two layers apart.at the baffles. Also, at the top joint I thought it was backed up with a rusty metal strip. I was wrong. It was just deteriation from age. My tank had only had a total of 250 gals. of ethanol put through it.
I don't want to steal this thread, but after seeing the makeup of these tanks, I don't think relining is a viable long term solution. Besides the chance of an adhesion problem that Cap'n Pat has spoken of in the past, how would you seal up where the baffle rivets are? If you take the baffles out to seal, then how do you put them back in? Just something to think about before going that route.
DELAMINATION
RUST
TOPJOINT DETERIATION
Last edited by lobsta1 on Jan 2nd, '07, 11:30, edited 1 time in total.
Even though these old Bert tanks had a long life, it seems their service life was not "forever."
It might be just coincidence that some of them are reaching the end of their natural life as ethanol is being widely introduced...and the ethanol is probably exploiting any weaknesses of old age.
Just a thought: Why go with three tanks when two would be easier and accomplish the same thing. The bottom half of the existing tank would be your day tank, and the "saddle tank" or bunker would go atop that actually spanning clean accross the day tank. The top tank would have to be a tad shorter than the bottom tank to allow for a place to afix fuel fittings etc. to the bottom tank.
I guess I read the original post wrong... maybe not...
In the old cutout left over from the fiberglass tank are you planning on placing three tanks or are you planning on having a tank that mimics the original and two saddle tanks in addition?
Hi guys, The new tank will be narrower then the original [remove old tank sides]. This will allow my saddle tanks to be mounted better and go beyond the original [more gas], but will be easily removed for if necessary strut, etc, repairs.
what good is a boat if you cant spend all your money and time you dont have working on it.
being contacted once again concerning information about tank relining I feel I will share with you all the hours of research that went into the relining process we used.
Please note- I do not wish to line tanks, it is VERY time consuming, and the coating we used are VERY expensive.
The cost of the coatings with no labor comes close to the cost of a new tank.
I am not soliciting work for this process, I just wish to clear up some information regarding the process that I used.
If there is interest I will share what we found out, the tank that was lined was for someone who is in the business, the linings used are not available to the general public, they are meant to line steel, concrete, and fibeglass tanks and pipelines that store and transfer fuel.
More importantly- they were designed to adhere to the strict guidlines for the oil and pipeline industry and are approved for 100% ethanol storage,as well as GASAHOL storage.
There is a primer that is the key to the process- if there is any contamination of the substrate, which we found, off the shelf coatings and primers will not stick to them. The process we used is a 3 coating process totalling 30mils with the one we did coming closer to 50 mils.
There is also cleaning, grinding, re-riveting, re-glassing, etc...
There are specific length and grip rivets that you must use- monel and stainless, you have to not only cut the baffles out, but you must grind away all the fiberglass along the rivet lines, which number into the 300 rivet range, and drill out the old rivets.
I know alot of you are hands on, but this is not a job for the faint of heart, you must also properly pressure test the tank for leaks when done.
It is also IMPOSSIBLE to do in the boat, which I have read some people contimplating.
Again I can go into more detail, but the bottom line is do not confuse one lining with another. It is cheaper to go with a aluminum tank.
My welder also tells me he cannot legally certify a stainless tank of that size to go in a gas powered boat. I dont know if thats a certain qualification he does not have, or if that is just the way it is.
So stainless tanks might not be a option worth considering.