Adventures installing the new generator...

The Main Sand Box for bertram31.com

Moderators: CaptPatrick, mike ohlstein, Bruce

Post Reply
Navatech

Adventures installing the new generator...

Post by Navatech »

I've finally started on installing the new generator (MASE IS 19)... The thing that I worried most about (the actual placing and securing of the unit) was a walk in the park...

Image

I hooked up fuel and fuel return... New Racor 500... Fuel bulb in the line to help with priming... Seawater cooling system with new vented loop and new strainer... Great I thought, this is going good... Let's do the exhaust system and we'll be done... But then Murphy showed up... As I was pulling a bit on the exhaust hose part that's connected to the transom exhaust through hull I heard a sharp crack and was left holding the exhaust hose still connected to the through hull (with backing plate) and a gaping hole that I could put a fist through in the transom... Luckily only a small fraction of the hole was under the waterline and I have several foamy plugs on board... It was only a small dribble but I wasn't going to take any chances...

Image

Earlier today I used a scrap piece of starboard and some special epoxy that's also supposed to work under the water line to create a cofferdam... The yellow line is holding the cofferdam in place while the epoxy is setting...

Image

Tomorrow I'll grind down and feather the surrounding fiberglass and then I'll start rebuilding that part of the transom with epoxy and alternating layers of mat and cloth... Next haul out I'll finish the outside of this repair... Yeah, I know, the best thing to do would be to haul her out and effect a full repair on the dry... However, for several reasons that's not possible right now... So this will have to do...

Never a boring day on this boat...
Last edited by Navatech on Sep 10th, '15, 06:40, edited 3 times in total.
Navatech

Re: Adventures installing the new generator...

Post by Navatech »

I also have an electrical quandary but more about that after I've come back from dinner...
Navatech

Re: Adventures installing the new generator...

Post by Navatech »

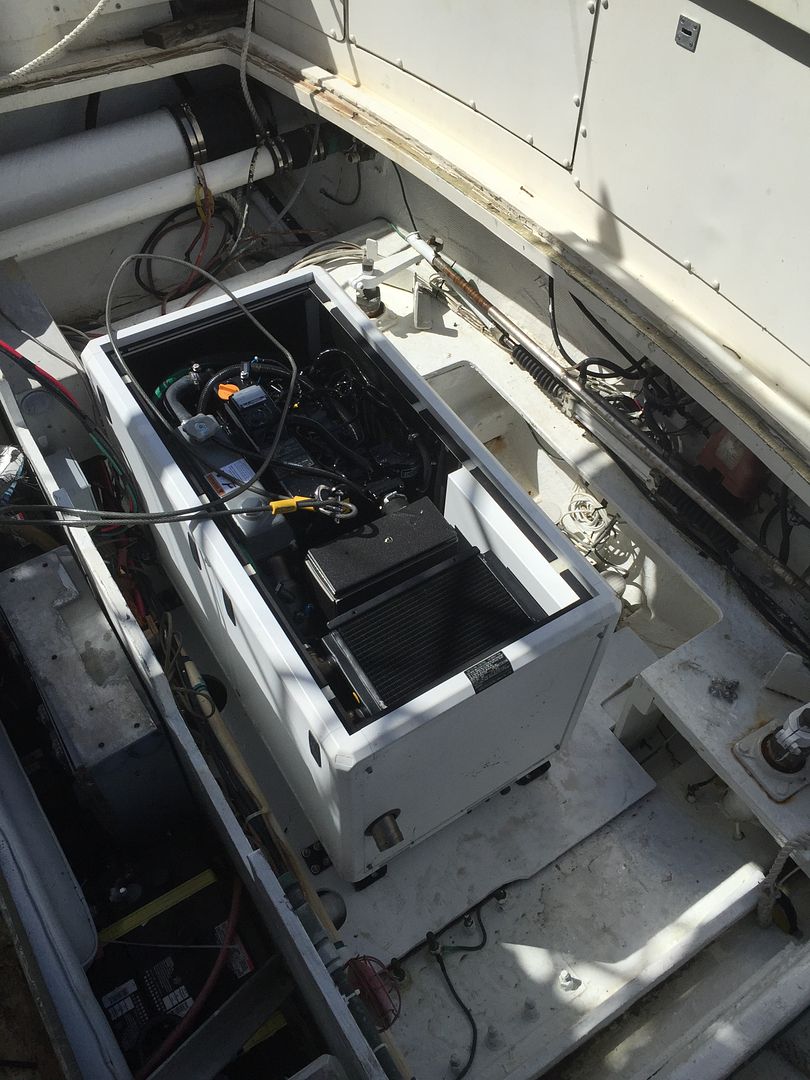
OK, now about that electrical quandary, and I'm hoping the brothers that do electrics professionally (I seem to recall that we have a few of those) can advise me here...

At the time I purchased the new generator I didn't have the boat's electrical schematics, I also knew a lot less about the boat then I know now... When it came time to ship the generator the MASE rep asked me whether I wanted the generator set up as a straight 120 or as a 120/240... The (original) cable running from the electrical panel had 4 wires in it:
  1. Black 4 gauge wire (presumably line 1)
  2. Black with red stripe 4 gauge wire (presumably line 2)
  3. White 4 gauge wire (presumably a common neutral)
  4. Green 6 gauge wire (presumably a common ground)
So the generator was set up as 120/240...

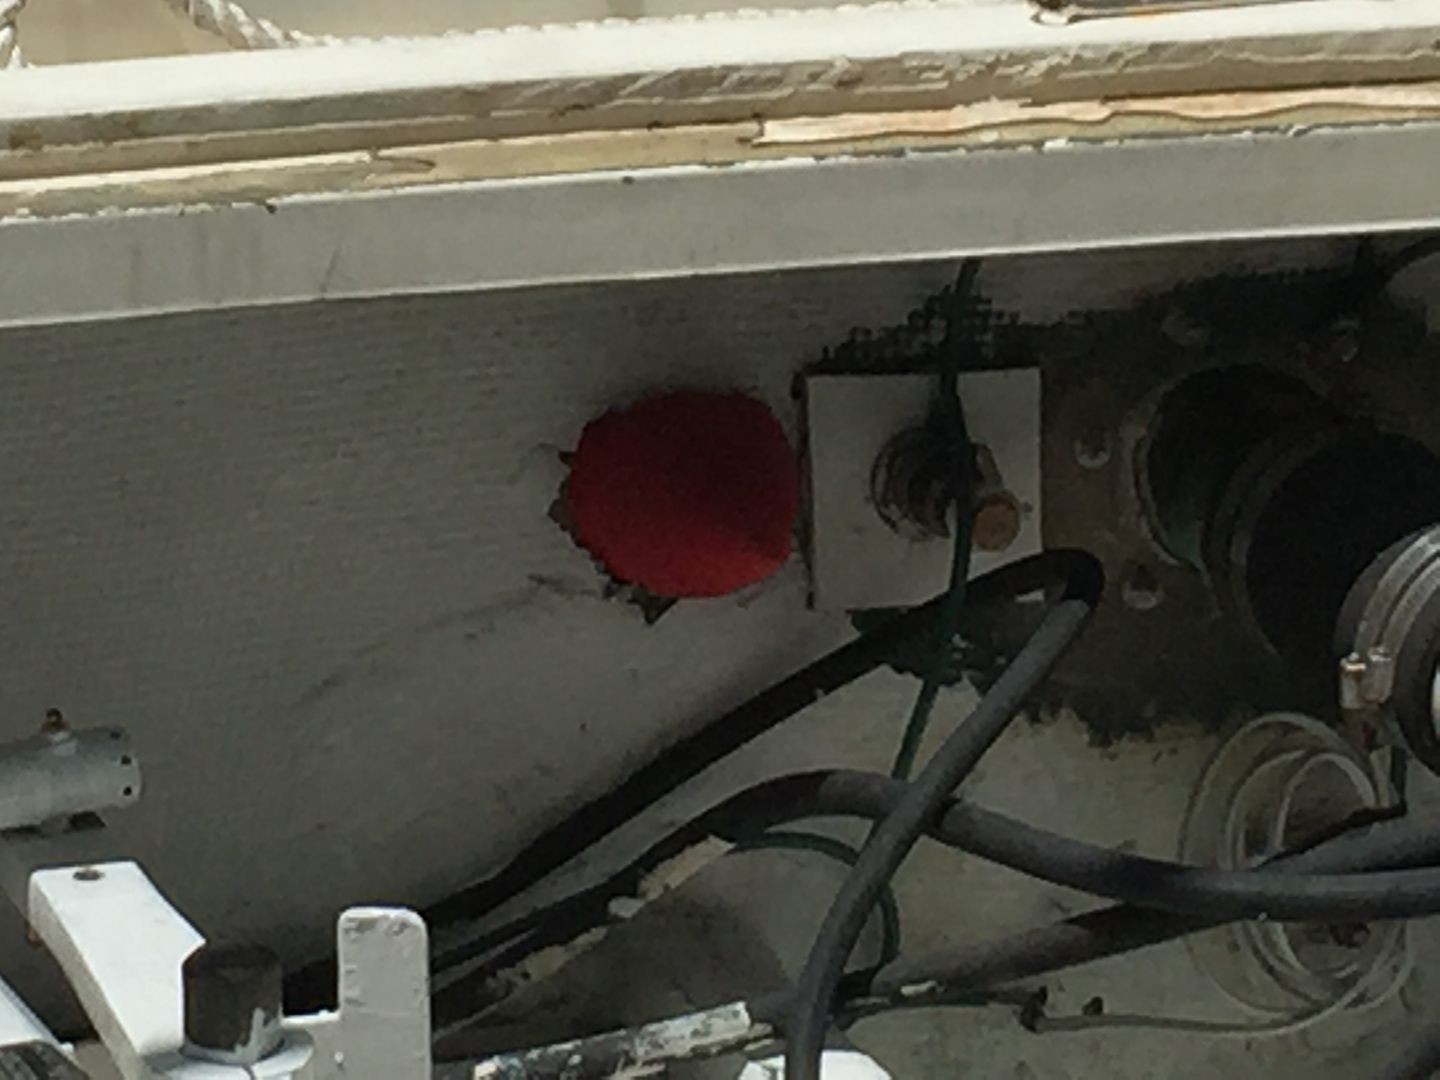
Yesterday, while waiting for the cofferdam epoxy to set I studied the relevant electrical schematic and the actual panel... It took me a while and I had to track the wires electrically because the schematic and what's actually on the boat do not add up... Here's the schematic:

Image

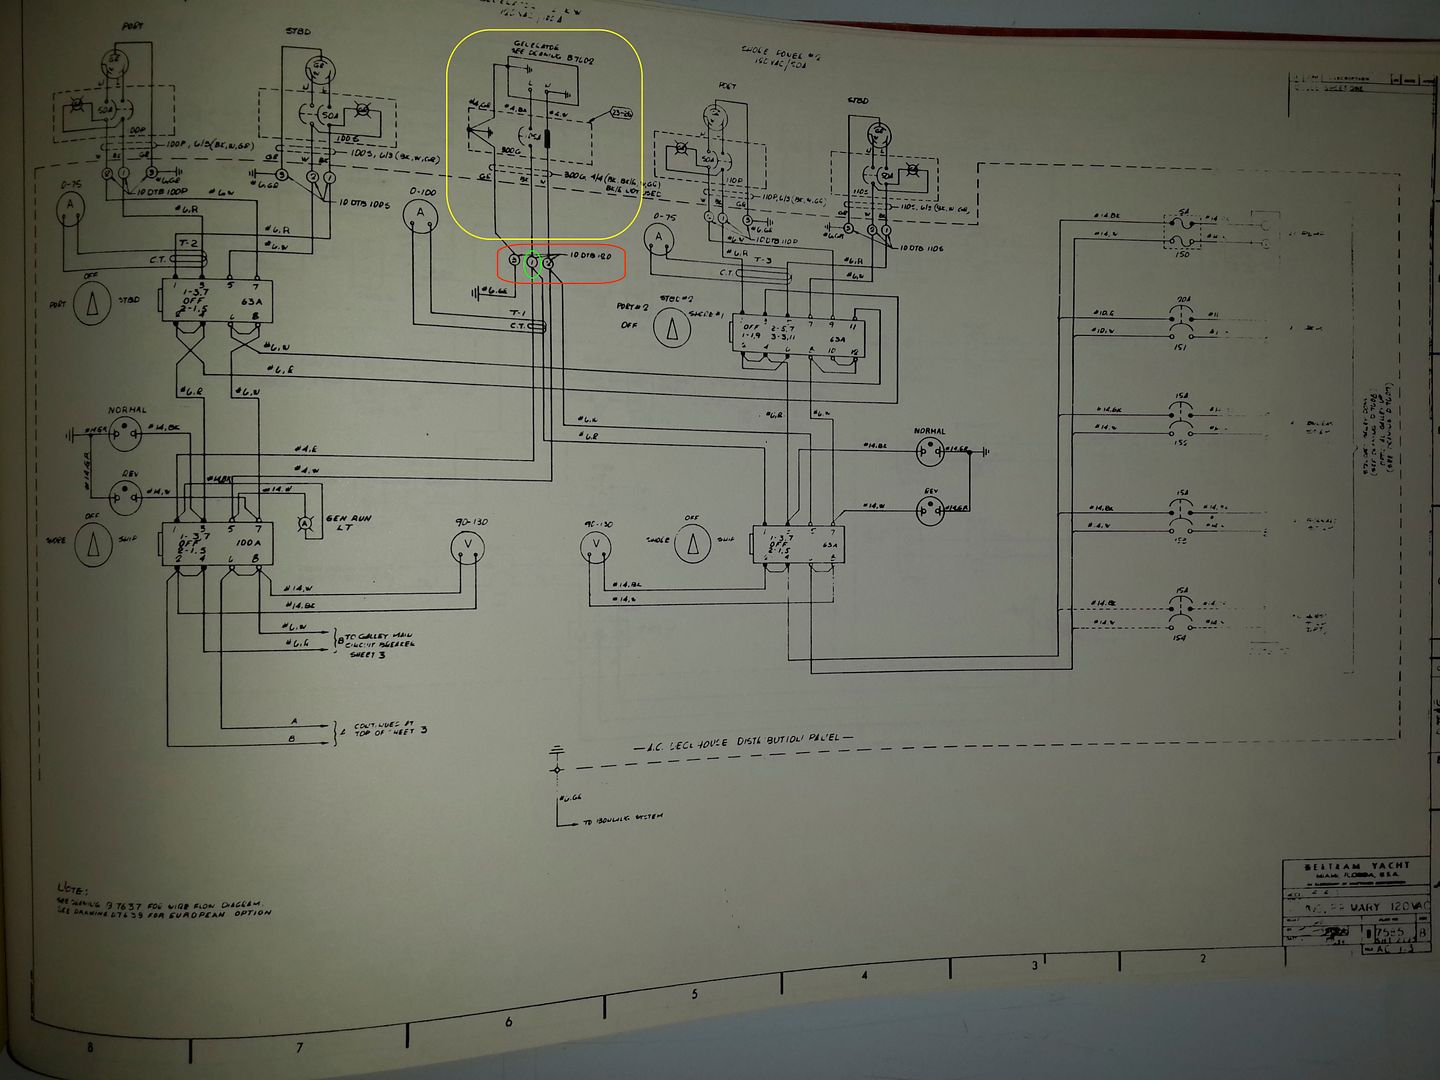
According to the yellow highlighted area the wiring is for a straight 120 volt setup... Terminal block 10DTB/120 (highlighted in red) receives power from from the generator... In the schematic the terminal block is shown horizontally with the top side receiving the power... In practice the terminal block is vertical with the left side receiving the power... And what's there is as follows (from top to bottom):
  1. Black with red stripe wire: Line 1
  2. Black wire: Line 2
  3. White: Neutral (common)
  4. Green: Ground (common)
The right side of the terminal block actually does add up to the schematic... What's there is as follows (from top to bottom):
  1. Black with red stripe wire: not used
  2. Black wire: 2 red wires, one connected to the "A/C" selector (off, shore, generator) switch and the other one connected to the “house” selector (off, shore, generator) switch in the panel
  3. White wire: 2 white wires, one connected to the "A/C" selector (off, shore, generator) switch and the other one connected to the “house” selector (off, shore, generator) switch in the panel
  4. Green wire: connected to ground strip in the panel
Looking further at the schematic (see red highlighted section) it seems to me that after the 10DTB/120 terminal block the “house” and “A/C” sections are basically separate... This leads me to “THINK” (a dangerous - pun intended - thing, especially with high voltage electricity) that this boat has a provision allow either a straight 120 volt or 120/240 volt setup... If true, then all I have to do is split the common line (see green highlighted section) in order to run a 120/240 setup... I really want to run a 120/240 setup because I want to ditch the heavy and bulky 120 volt water heater and run an on demand water heater...

Basically what I’m thinking is the following change (blue text) to the right side of the 10DTB/120 terminal block:
  1. Black with red stripe wire: (a.k.a. line 1) connected to the "A/C" selector (off, shore, generator) switch in the panel
  2. Black wire: (a.k.a. line 2) connected to the “house” selector (off, shore, generator) switch in the in the panel
  3. White wire: 2 white wires, one leading to the "A/C" selector (off, shore, generator) switch and the other one leading to the “house” selector (off, shore, generator) switch in the panel
  4. Green wire: connected to ground strip in the panel
Will this work?!... Is it safe?!...
User avatar
Carl
Senior Member
Posts: 5954
Joined: Jul 5th, '06, 06:45
Location: Staten Island NY

Re: Adventures installing the new generator...

Post by Carl »

Navatech,

Sorry, no insight on electrical from me...


But did want to mention that as I understand it, very little adheres well to Starboard.

If epoxy is all that will be holding starboard patch in place....you might want to verify.
Last edited by Carl on Sep 10th, '15, 09:25, edited 1 time in total.
User avatar
CaptPatrick
Founder/Admin
Posts: 4161
Joined: Jun 7th, '06, 14:25
Location: 834 Scott Dr., LLANO, TX 78643 - 325.248.0809 bertram31@bertram31.com

Re: Adventures installing the new generator...

Post by CaptPatrick »

very little adheres well to Starboard
And what does adhere is a very weak bond, usually less than 200 psi bond strength. Structural bonding generally needs to be over 1,200 psi...
Br,

Patrick

Molon labe
Navatech

Re: Adventures installing the new generator...

Post by Navatech »

Guys, I already KNOW that very little if anything adheres well to Starboard... The Starboard plate is NOT a structural repair!!! It's only a cofferdam (temporary water restriction)... It's there right now to serve 2 purposes:
  1. To keep out the dribble of water that would otherwise come in (lower left part of the hole is just ON the waterline)... Keeping in mind that water, aside from flooding the boat (no wake isn't really observed here), would interfere with the adhesion of the epoxy of the structural repair...
  2. As a backing to build up the structural repair against...
In fact, in a way I'm COUNTING on the Starboard NOT being very well glued to the transom as eventually, once I'm hauled out again, I'm going to remove it, grind into the transom from the outside and lay up a few more layers of fiberglass with epoxy...

The cofferdam serves no structural purpose and is, after I have finished grinding and the epoxy of the first layers of laid up fiberglas has cured, utterly redundant!!!

I'm also not worried about the line going through the layers of epoxy and fiberglass... The line will be cut as soon as the first layers of epoxy and fiberglass have cured... And, in any case, once the transom has been patched I'll be drilling a new hole through the patch for the generator's exhaust through hull...
User avatar
Carl
Senior Member
Posts: 5954
Joined: Jul 5th, '06, 06:45
Location: Staten Island NY

Re: Adventures installing the new generator...

Post by Carl »

Well alrighty then...

Definitely my bad assumption. I assumed that if you were concerned enough to install a temporary patch...you might have some concern in knowing the patch may not hold all that well.

But as you said...you know, so its all good.
Navatech

Re: Adventures installing the new generator...

Post by Navatech »

OK, the cofferdam is holding so I have ground and feathered the transom in the location of the hole... The backing plate of the "next door" through hull (cockpit drain) was in the way of a good grinding and feathering so that was also removed... I'll install a single backing plate when finishing up the job...

Image

The grinding loosened up some of the special epoxy so I applied some more and let it set...

Then I laid down 4 layers (alternating between mat and fabric)... Will continue building up as soon as this dries up almost completely...

Image
Post Reply

Who is online

Users browsing this forum: Bing [Bot], Google [Bot] and 75 guests