Engine Box Refinish

The Main Sand Box for bertram31.com

Moderators: CaptPatrick, mike ohlstein, Bruce

Post Reply
HotSpot
Posts: 131
Joined: May 9th, '18, 12:03
Location: Illinois/Wisconsin

Engine Box Refinish

Post by HotSpot »

Hi All,

I am about to start a project that has been creeping up on me since taking delivery of the boat a couple years ago. The paint on the engine cover has been gradually peeling up in spots over the majority of the top and to some extent toward the bottom edges of the sides. For a while, a little touchup paint has made it livable, but it got worse over last season, and I now find myself with some time on my hands to get into this. Thankfully, this is the only part of the boat that's doing this.

Image

So, first thing is to get this back into a surface that can be prepped for paint.

Obviously all the peeling paint needs to come off. But I am also thinking that the paint that is not currently flaking will eventually come up too. So, I am planning to strip the entire thing down to get a stable surface to start building up fresh. Probably all the way down to the glass or at least past the topcoat and this red stuff which is also peeling in places.

Any advice on techniques and tools to get this first step done with minimal effort? I have no misconceptions that this will be a lot of work, but just hoping you guys can help me avoid unnecessary work.

The game plan was to brute force this with a belt sander for the majority of the flat surfaces and maybe even the curved lip. Am I on the right track there? Any other thoughts on alternate approaches or tools to get this done as efficiently as possible?

Thanks!

HotSpot
HotSpot - ‘61 25 Sport Convertible - Hull# 25-109
HotSpot
Posts: 131
Joined: May 9th, '18, 12:03
Location: Illinois/Wisconsin

Re: Engine Box Refinish

Post by HotSpot »

Taking a closer look. These cracks go pretty deep in the underlying layers... Could this be the cause of the peeling of the topcoat? Or is it an after-effect from the top coat having come off? Or is this a fiberglass issue?

Image
HotSpot - ‘61 25 Sport Convertible - Hull# 25-109
Yannis
Senior Member
Posts: 2991
Joined: Oct 23rd, '13, 09:41
Location: Athens, Greece

Re: Engine Box Refinish

Post by Yannis »

Does it flex when you sit or step on it?
1973 B28 FBC/2007 4LHA STP's - "Phantom Duck" - Hull "BER 00794 1172"
HotSpot
Posts: 131
Joined: May 9th, '18, 12:03
Location: Illinois/Wisconsin

Re: Engine Box Refinish

Post by HotSpot »

Yannis wrote:Does it flex when you sit or step on it?
Hi Yannis

As it is currently pictured above, just freestanding on the garage floor...

When I stand on the back edge near the hole where the pull ring would be, it does flex in a noticeable way. The sides actually start to wing outward just a little when I bounce on it. However, that area is usually supported by the cowling that surrounds the transom when installed on the boat. Unfortunately, I can't check this installed on the boat since it is in storage.

When I stand on the corners toward the front edge (which should be the strongest areas), there is no flex. Moving from there toward the less supported area, there begins to be some flex.

If flex related, would the peeling be concentrated on those areas that flex?

Thanks
HotSpot - ‘61 25 Sport Convertible - Hull# 25-109
User avatar
Carl
Senior Member
Posts: 5960
Joined: Jul 5th, '06, 06:45
Location: Staten Island NY

Re: Engine Box Refinish

Post by Carl »

Machinist and complete non paint person, so take this from where it comes...

I believe what you are seeing is the gelcoat cracking.
That is about the end of my knowledge...but that never stops me from guessing out loud....


From my understanding Bertram used a harder gelcoat then most.

This may be hearsay or I'm totally off base...but think I heard fiberglass never fully cures but as it does it "shrinks"? and the gelcoat cracks.

I believe if you want to do the job right, as in look good and last, the gelcoat needs to come off, surface faired and painted.

If you don't, my guess is what happened to my several of my touch ups form years back. They look great for awhile, then the cracks bleed through.
Yannis
Senior Member
Posts: 2991
Joined: Oct 23rd, '13, 09:41
Location: Athens, Greece

Re: Engine Box Refinish

Post by Yannis »

May I add to what Carl said;
once the old coat is completely removed, the surface faired and prepped for the new gelcoat or paint, it would be a good idea IF there is enough clearance between the engines and the box, to glass-in a few transversal supports. That way you would minimize the possibility of anything similar happening again.
Again, this is if all this is caused by flexing.
Have you checked the temperature below the box when the engines run? Maybe those layers of gelcoat or paint were not made to withstand heat?
1973 B28 FBC/2007 4LHA STP's - "Phantom Duck" - Hull "BER 00794 1172"
kross1
Posts: 179
Joined: Nov 17th, '17, 15:45
Location: Long Island

Re: Engine Box Refinish

Post by kross1 »

Hotspot
No expert either. Maybe after you get it down to bare fiberglass might be a good idea to put a couple of fresh layers of new fiberglass on top for strength.
B28 "NINA PETER SANTA MARIA"
HotSpot
Posts: 131
Joined: May 9th, '18, 12:03
Location: Illinois/Wisconsin

Re: Engine Box Refinish

Post by HotSpot »

Thanks, Carl and Yannis.

OK, I'll assume that all the original gelcoat surface below the top coat of paint is cracking like where it is exposed, and will continue to cause problems if it is just covered up.

As far as support goes. It should be possible to add a structural piece as Yannis mentioned. The highest points are the air filter, oil cap, and heat exchanger, but there are some gaps between them, and also no engine from several inches from the back edge of the box (at its weakest point).


So, is a belt sander the best way to remove the old paint and gel coat? Would chemicals be an option?

Would laying a fresh layer or two of fiberglass across the top be easier than sanding past the gelcoat cracks, or will that present problems down the road too?
HotSpot - ‘61 25 Sport Convertible - Hull# 25-109
HotSpot
Posts: 131
Joined: May 9th, '18, 12:03
Location: Illinois/Wisconsin

Re: Engine Box Refinish

Post by HotSpot »

kross1 wrote:Hotspot
No expert either. Maybe after you get it down to bare fiberglass might be a good idea to put a couple of fresh layers of new fiberglass on top for strength.
Thanks, Kross...

Yeah, that sounds like a good way to get both a little strength and a fresh surface.
HotSpot - ‘61 25 Sport Convertible - Hull# 25-109
kross1
Posts: 179
Joined: Nov 17th, '17, 15:45
Location: Long Island

Re: Engine Box Refinish

Post by kross1 »

As far as sanding I think I would try a random orbit sander possibly with 36 grit paper.
B28 "NINA PETER SANTA MARIA"
User avatar
Carl
Senior Member
Posts: 5960
Joined: Jul 5th, '06, 06:45
Location: Staten Island NY

Re: Engine Box Refinish

Post by Carl »

Before you start laying glass, I'd wait for some of our resident experts in the area peoples give you there recommendation.

My guess is a layer of glass does little to beef up the integrity of an open panel without building structure in. You know those odd boxed out shapes, like stringers and returns. Kinda like a sheet of paper on its side can't hold itself up...but roll it into a tube, stand it on end and it will hold up a heavy book.
Besides that, you'd have to fair the glass smooth and flat...good luck.

Next part is the gelcoat was just for purdy purpose, not a structural application...I believe.
kross1
Posts: 179
Joined: Nov 17th, '17, 15:45
Location: Long Island

Re: Engine Box Refinish

Post by kross1 »

Well if you reinforce it like a tank you can sit on it stand on it dance on it and even and Odd thought fish off of it good luck. :P
B28 "NINA PETER SANTA MARIA"
User avatar
DanielM
Senior Member
Posts: 398
Joined: Jun 29th, '06, 23:12
Location: Texas coast

Re: Engine Box Refinish

Post by DanielM »

HotSpot,

The advice I received years ago was that an orbital is a finish tool, that I needed to use an angle grinder for heavy work.

I think you’re looking at angle grinder time vs. a random orbital sander. 36 grit wheel to start with. Good luck.
Tony Meola
Senior Member
Posts: 6932
Joined: Jun 29th, '06, 21:24
Location: Hillsdale, New Jersey
Contact:

Re: Engine Box Refinish

Post by Tony Meola »

Bertram did not paint any of these boats. It was all gelcoat with the color tinted into it. Someone painted the box to cover the stress cracks and now the cracks are coming through the paint. Strange thing is the gel looks to be either a brown or a reddish color. Once you get past the gelcoat you should see green glass, not brown or red.

I wonder if they tried to cover the stress cracks with some type of sealer. I know of some guys who tried Interprotect to seal up the cracks and then painted. It could be some type of finish like that that was down before the paint. If not prepped right the paint would peel off.

I am not sure what is the best way of grinding off the gel coat. Try to see if you can rent one of these some place. https://paintshaver.com/marineshaver-pro/

Actually any type of paint shaver should work, rental shops may have them in stock. Could save you a lot of grief. Kind of expensive to buy.

If you need to add more support to the cover, I would do it from the inside and not the outside. Depending on how much room you have from the top of engine to the box will depend on how thick you can go. I would make sure you leave room for sound down should you want to quiet down the engines. If I was adding anything I would stick with Coosa Board or a similar material. Half inch ply glassed to the inside would really create too much weight and not sure how the ply would hold up against the heat, even when glassed in.

Take a look at the links below. They may help you out. They are from the Tips page.

http://bertram31.com/proj/tips/re-gelcoating.htm
http://bertram31.com/proj/tips/pvc.htm
http://bertram31.com/proj/swim_plat/index.html
http://bertram31.com/proj/tips/core.htm
1975 FBC BERG1467-315
HotSpot
Posts: 131
Joined: May 9th, '18, 12:03
Location: Illinois/Wisconsin

Re: Engine Box Refinish

Post by HotSpot »

I think you guys put me on the right track.

The paint shaving tool reminds me of a concrete wheel for an angle grinder. I may try that if one of those paint stripping wheels doesn't work well.

The top coat is very tough to sand through using an orbital, but the undercoats are actually pretty soft. I was able to get a small patch sanded down so that we could see what was below the red stuff. Indeed, there is white gel, (cracked throughout) and then fiberglass. The red must be some kind of primer or filler, as Tony mentioned. On top of the red, there was a very thin gray coat which didn't catch in this picture, but it looks like primer.

Image

I think I'll try a wheel for the grinder on a small section to see how effective it is.

Once that is done there will be some fiberglass work because I found that some of the coring on the sides at the very bottom was rotten. This is getting to be a bigger project at every corner!

Regarding adding the transverse supports, I'll have to remove the sound material that is already there to get to the underside. But I do like the idea of just adding a piece of starboard or coosa across, and then glassing it in. Looking at pictures, it seems there will be plenty of room.

Thanks for the links too, Tony. Sometimes I forget that there is a wealth of information here beyond the bulletin board. :)


Thanks again, guys.
HotSpot - ‘61 25 Sport Convertible - Hull# 25-109
User avatar
Carl
Senior Member
Posts: 5960
Joined: Jul 5th, '06, 06:45
Location: Staten Island NY

Re: Engine Box Refinish

Post by Carl »

If its hard paint...think Imron
Gummy paint- it's likely awlgrip

In both cases...take the needed precautions with the dust produced, its not good for you or those that may come out to watch. I'd say help...but grinding and sanding I find offers few volunteers.

Good luck and have fun...think many of us here know the loads of true enjoyment and overwhelming feeling of self gratification after stripping, smoothing and fairing a surface for paint.

LOL...yeah right.
Tony Meola
Senior Member
Posts: 6932
Joined: Jun 29th, '06, 21:24
Location: Hillsdale, New Jersey
Contact:

Re: Engine Box Refinish

Post by Tony Meola »

It might be cheaper trying to chase down new box's. Not sure if Cabrera Yacht parts is still around. If they are and you have a Spanish speaking friend it will make your journey with them much easier. You can also try Glass Tech and Dany at High Tide Marine.

I would try that area before going through all that grinding and painting for the box's.
I found this online.

https://www.youtube.com/watch?v=FqcBDqsejQs
1975 FBC BERG1467-315
HotSpot
Posts: 131
Joined: May 9th, '18, 12:03
Location: Illinois/Wisconsin

Re: Engine Box Refinish

Post by HotSpot »

Tony Meola wrote:It might be cheaper trying to chase down new box's. Not sure if Cabrera Yacht parts is still around. If they are and you have a Spanish speaking friend it will make your journey with them much easier. You can also try Glass Tech and Dany at High Tide Marine.

I would try that area before going through all that grinding and painting for the box's.
I found this online.

https://www.youtube.com/watch?v=FqcBDqsejQs

That is some amazing work they did on that cockpit. However, the cost of shipping alone for a new box likely blows the budget here...

Good news is that I was able to find a paint stripping wheel, and went to work on the top of the box with the grinder (and appropriate safety gear). The wheel made really quick work of the top coat. Once the that was off, I switched over to the orbital sander with the hope that it would be able to collect more dust, but it was ineffective compared to the grinder. So switched back and continued all the way down to the glass on the top and part of the sides.

Whatever that red stuff is was put down directly on top of the cracked gel coat. In some places it was very solid, and others it was just as cracked as the gel and was flaking right off.

Regardless, it took no more than 40 minutes of work to get stripped down to the glass. Now we have a good place to start working on the fairing and finishing, with better chances of success.

This was what I was hoping for when looking for help here.

Thanks again, guys!
HotSpot - ‘61 25 Sport Convertible - Hull# 25-109
John Swick
Senior Member
Posts: 280
Joined: Jul 20th, '06, 10:30
Location: S. Georgian Bay, Canada
Contact:

Re: Engine Box Refinish

Post by John Swick »

Take it to a sandblasting contractor.
They'll make quick work of it.
Best $$ spent.
1971 31' Bahia Mar hull# 316-1035
Tony Meola
Senior Member
Posts: 6932
Joined: Jun 29th, '06, 21:24
Location: Hillsdale, New Jersey
Contact:

Re: Engine Box Refinish

Post by Tony Meola »

I have to second the sand blasting, but that can also lead to another whole host of issues if not done right.
1975 FBC BERG1467-315
User avatar
Carl
Senior Member
Posts: 5960
Joined: Jul 5th, '06, 06:45
Location: Staten Island NY

Re: Engine Box Refinish

Post by Carl »

It's an engine box...some elbow grease and let him get INTO the project, be one with the boat.


It also gives a good perspective if he should think about expanding that project in the future to hull, top side etc.
The whole...eh...how bad could it be? Now he'll know.
Stephan
Senior Member
Posts: 655
Joined: Mar 30th, '11, 05:41
Location: Providence, RI

Re: Engine Box Refinish

Post by Stephan »

Carl wrote:It also gives a good perspective if he should think about expanding that project in the future to hull, top side etc.
The whole...eh...how bad could it be? Now he'll know.
Carl- is spot on as usual.
If you are fortunate you take on one of these jobs and do not enjoy it and do not like the result.
/end
If you are unfortunate, you find you like to job and are pleased with the result.
<! There goes your fortune>

Image
Possunt quia posse videntur
User avatar
Carl
Senior Member
Posts: 5960
Joined: Jul 5th, '06, 06:45
Location: Staten Island NY

Re: Engine Box Refinish

Post by Carl »

Stephan wrote:
Image


I've never heard that quote before...I really like it and right on target too.
HotSpot
Posts: 131
Joined: May 9th, '18, 12:03
Location: Illinois/Wisconsin

Re: Engine Box Refinish

Post by HotSpot »

Carl wrote:It's an engine box...some elbow grease and let him get INTO the project, be one with the boat.


It also gives a good perspective if he should think about expanding that project in the future to hull, top side etc.
The whole...eh...how bad could it be? Now he'll know.
The opportunity to be one with the boat... That's why I chose a classic Bertram. What better boat to become one with? :)

I actually did enjoy this portion of the project. Would I tackle the entire hull or foredeck? Hmmm... Not sure, and glad that I don't have to right now. However, I'd have much more confidence starting something like that after gaining experience with this engine box. This was a good starter project in regard to refinishing since it was easily transported home to be done in the garage where I have ample access to it, and it's climate controlled. Also, in the end, much of it will be covered by a seat cushion anyway!


Here's the results:
From the looks of that strip of different colored glass down the center, it may have been cut and modified at some point, perhaps during the repower work from years ago. Not sure about those rings. Maybe from paint cans or buckets. Now on to fairing and paint!

Image

Image

Thanks again, guys. I am glad to have learned from those who picked up the cat before me.
HotSpot - ‘61 25 Sport Convertible - Hull# 25-109
User avatar
Carl
Senior Member
Posts: 5960
Joined: Jul 5th, '06, 06:45
Location: Staten Island NY

Re: Engine Box Refinish

Post by Carl »

I'd guess that center section is a cored rib to give structure and support.

What do you see from the underneath? If a rib...well it would look like...well a rib / a channel. Something not flat on the same plane. I'd guess a piece of wood that they laminated around...the shape creates a tube...a way to distance the two layers adding stiffness and strength.
Tony Meola
Senior Member
Posts: 6932
Joined: Jun 29th, '06, 21:24
Location: Hillsdale, New Jersey
Contact:

Re: Engine Box Refinish

Post by Tony Meola »

I have to agree with Carl. I would think it was for support to limit flexing. Now that answers your question about adding more support. That almost make more sense then making the box thicker on top and thus heavier. With Todays material, you could go with a support piece instead of a rib for support.
1975 FBC BERG1467-315
John Swick
Senior Member
Posts: 280
Joined: Jul 20th, '06, 10:30
Location: S. Georgian Bay, Canada
Contact:

Re: Engine Box Refinish

Post by John Swick »

It's a very early model yr., that had the smallest of motor boxes for the original 'iron duke' 4cyl motors.
Dollars to donuts, the motor box and well were enlarged for a repower.
It is what it is, but it didn't come out of the factory (in '61 or '62) like that.
Look forward to your progress reports.
I'm surprised no one has quoted a version of the golden rule of projects....
1971 31' Bahia Mar hull# 316-1035
User avatar
scot
Senior Member
Posts: 1470
Joined: Oct 3rd, '06, 09:47
Location: Hurricane Alley, Texas
Contact:

Re: Engine Box Refinish

Post by scot »

be one with the boat
Outstanding :-)
Scot
1969 Bertram 25 "Roly Poly"
she'll float one of these days.. no really it will :-0
HotSpot
Posts: 131
Joined: May 9th, '18, 12:03
Location: Illinois/Wisconsin

Re: Engine Box Refinish

Post by HotSpot »

Carl wrote:I'd guess that center section is a cored rib to give structure and support.

What do you see from the underneath? If a rib...well it would look like...well a rib / a channel. Something not flat on the same plane. I'd guess a piece of wood that they laminated around...the shape creates a tube...a way to distance the two layers adding stiffness and strength.

After removing the sound insulation from the underside, it appears that there is a piece of plywood glassed in under that section when the box was widened. Its 1/2 in thick at most, and extends beyond that visible splice on both sides as it tapers off over 6 inches or so.

Image


To maintain the original transom cover's dimensions, the back side of the box necks back down to the original size of its opening, as seen by some additional dark gray filler and wood (ack!). This will be glassed and faired before paint. The other side too.

Image


Here's a view of it compared to the original from an old brochure... The side of the engine box is flush to the transom cover opening in the original layout.
Image
Image

So, the AQ131s that are already a very tight fit with the mods were not going to work with the original dimensions. Yes the engine well was also widened. I only wish they would have given a little more room so that replacing the raw water pump and timing belt pulley would have been possible without lifting the motor!
Last edited by HotSpot on Apr 10th, '20, 12:56, edited 1 time in total.
HotSpot - ‘61 25 Sport Convertible - Hull# 25-109
HotSpot
Posts: 131
Joined: May 9th, '18, 12:03
Location: Illinois/Wisconsin

Re: Engine Box Refinish

Post by HotSpot »

John Swick wrote:It's a very early model yr., that had the smallest of motor boxes for the original 'iron duke' 4cyl motors.
Dollars to donuts, the motor box and well were enlarged for a repower.
It is what it is, but it didn't come out of the factory (in '61 or '62) like that.
Look forward to your progress reports.
I'm surprised no one has quoted a version of the golden rule of projects....
Looking at the old brochure photos, those original engines sure were skinny little things.

The Golden Rule of projects? Take whatever time and $$ budgeted and then double it. What if I already accounted for that in my original estimate? Does it mean I still need to double it?

Is this an endless loop of expense and time? Of course.. Its a boat!
HotSpot - ‘61 25 Sport Convertible - Hull# 25-109
User avatar
ktm_2000
Posts: 994
Joined: Jul 17th, '18, 14:46
Location: Central Mass

Re: Engine Box Refinish

Post by ktm_2000 »

I just noticed this thread, here's my experience.

The red colored stuff in your images is a fairing compound /high build primer a previous owner used to try to stop the crazing.

My B25 has some of the gelcoat crazing as you've shown in your pics and the only way to permanently get around it is to sand it all off as you've done. From there If you haven't already encountered it you would have opened up tiny pinholes in the original layup that the gelcoat filled / spanned. Here's an image when I did some painting in 2007 https://photos.app.goo.gl/EWFoerJXtXcBmxrz6. You will probably need a pass with a high build primer then sand that to figure out where the pinholes are and fill those then spray again with the high build. It will be a several step process to bring it to completion.

as for the core of the engine box, it is 3/4" balsa, on my project I considered re-using the engine hatch as a seat and wanted storage underneath so cut into the core and found that it was wet.
https://photos.app.goo.gl/wKx5FS25tfpRrrPeA
Before cutting into it, it didn't flex and was plenty strong, as soon as I cut into it however it seems that the core delaminated on one side. I was able to scrape out the core with a putty knife pretty easily.
https://photos.app.goo.gl/RVvSQwNsUVWMuuc86
User avatar
Rawleigh
Senior Member
Posts: 3434
Joined: Jun 29th, '06, 08:30
Location: Irvington, VA

Re: Engine Box Refinish

Post by Rawleigh »

Good job. What is the stripper that you used? Would you recommend it to others?
Rawleigh
1966 FBC 31
HotSpot
Posts: 131
Joined: May 9th, '18, 12:03
Location: Illinois/Wisconsin

Re: Engine Box Refinish

Post by HotSpot »

Rawleigh wrote:Good job. What is the stripper that you used? Would you recommend it to others?
It's a Black and Decker brand I found at the local Menards (retail gem of the midwest, the only better thing is Fleet Farm). $3.95. It's pretty much worn down to the backing plate after this job, but it held up. It's probably the best value item on this whole project... I just started pricing out two-part paint! Yikes! :?
HotSpot - ‘61 25 Sport Convertible - Hull# 25-109
HotSpot
Posts: 131
Joined: May 9th, '18, 12:03
Location: Illinois/Wisconsin

Re: Engine Box Refinish

Post by HotSpot »

ktm_2000 wrote:I just noticed this thread, here's my experience.

The red colored stuff in your images is a fairing compound /high build primer a previous owner used to try to stop the crazing.
Thank you for that insight... Now that I see the layup, its clear to see why they used fairing compound. The glass substrate is very uneven, I can also feel the weave of the glass in sections. So, I am planning to resurface the entire top with a skin of epoxy fairing compound, and then prime and paint. I may go with a high build primer if the fairing compound still doesn't have a good finish.


I hope there is no water in there. Maybe I'll drill a small hole or two and investigate with a pick to see if there is delimitation going on. Please let me know if there is a better way to tell without cutting it all out.

At this point, I don't think it was flex that caused the peeling. That terrible crazing of the gel and the primer/fairing compound gave the paint no stable surface to adhere to. Over time, as the surface below continued to shrink and crack, it basically shed its skin.

Many thanks again to all! I am grateful for all this assistance!
HotSpot - ‘61 25 Sport Convertible - Hull# 25-109
User avatar
Rocky
Senior Member
Posts: 690
Joined: Nov 23rd, '08, 10:36
Location: Northern California

Re: Engine Box Refinish

Post by Rocky »

Image

Hang on a second,
I have had a few lectures on glass and finishing from a great professor in past here. In the original picture it looks like maybe there where heat cracks, or checking.
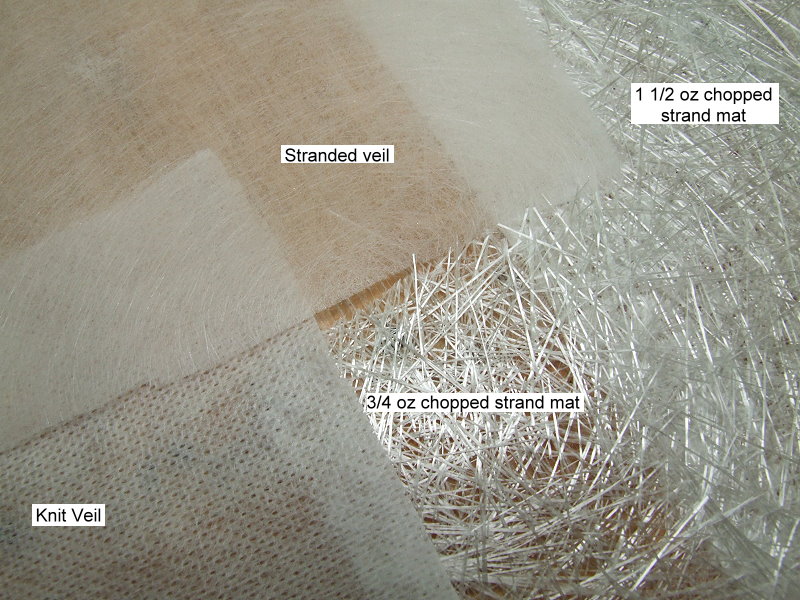
If it where me I would lay one, if not two, layers of veil over that original glass so the checking does not print through again on finished side of box. this gives the fairing compound and paint a new surface that is crack free. I know you took it down to Bertram green, but you can't be sure it is not heat damaged.
Yannis
Senior Member
Posts: 2991
Joined: Oct 23rd, '13, 09:41
Location: Athens, Greece

Re: Engine Box Refinish

Post by Yannis »

Rocky,

I agree with the layers. I also insist on beefing under with transversals. Nothing, just 2x3 cm ply glassed. 3 across and 2 longitudinal.
However, if you see the pics of 8/4 the clean glass is transparent, which suggests no heat damage.

PS how’s the pony?
1973 B28 FBC/2007 4LHA STP's - "Phantom Duck" - Hull "BER 00794 1172"
User avatar
Rocky
Senior Member
Posts: 690
Joined: Nov 23rd, '08, 10:36
Location: Northern California

Re: Engine Box Refinish

Post by Rocky »

Hi Yannis,
Yes we are currently horseless on property now, with the exception of a JD570
for mowing fields. Pony did not make it.
On engine box, any half round light material will stiffen underside. Closed cell foam, half round cylinder material or any shape like that glassed over will greatly stiffen that box. I’d make a elongated “T” with the half rounds and glass over.
User avatar
Rocky
Senior Member
Posts: 690
Joined: Nov 23rd, '08, 10:36
Location: Northern California

Re: Engine Box Refinish

Post by Rocky »

Forgot to mention,
If you want a wham bam thank you mam approach, these are dirt cheap and all the work done for you- just prep under box, wet out under stiffener, then wet out rolls, presto- instant stiff box.
https://www.jamestowndistributors.com/u ... ?pid=57774
HotSpot
Posts: 131
Joined: May 9th, '18, 12:03
Location: Illinois/Wisconsin

Re: Engine Box Refinish

Post by HotSpot »

Rocky wrote:Forgot to mention,
If you want a wham bam thank you mam approach, these are dirt cheap and all the work done for you- just prep under box, wet out under stiffener, then wet out rolls, presto- instant stiff box.
https://www.jamestowndistributors.com/u ... ?pid=57774

This is good... If it is flexible it would allow me to do this over the slight curve that the existing backing that was applied to the splice. I'll throw this in the basket along with a few more things I was going to get from them.


And while at it with glass, I'll throw down a couple layers of the veil.

Thanks again guys.
HotSpot - ‘61 25 Sport Convertible - Hull# 25-109
Post Reply

Who is online

Users browsing this forum: Google [Bot] and 87 guests